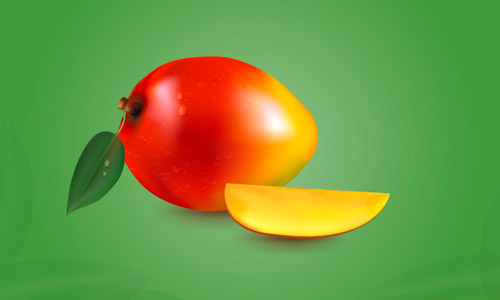
Follow this Adobe Illustrator tutorial if you want to learn how to draw a realistic mango. Everything here is made using the Mesh Tool therefore if you want to master this tool better, this is your chance. Let’s get started!
Draw the Shape of the Mango
1. Open a new document. First, take the Pen Tool (P) and draw a mango-shape like in the image below. If you believe that it is easier, you can search for a photo with a mango fruit and use it to trace the outline. Before you continue, make a copy of the shape because you will need it later. Now, take the Mesh Tool (U) and click somewhere in the middle of the shape. As a result you will obtain the first vertical mesh line and the first horizontal mesh line.
Next, focus on the vertical mesh line and using the Mesh Tool (U) click on it in the spots indicated to add three more horizontal mesh lines on the top half. Do the same thing at the bottom and add other four lines.
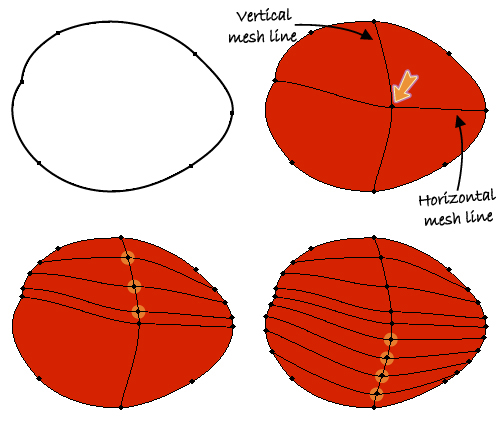
2. Now, let’s add more lines on the left side of the first vertical mesh line. Click on the mango-path in the three spots indicated to add the vertical lines then zoom in on the area shown in the close-up. Add 5 mesh points very close to each other as indicated and you will obtain 5 more vertical lines.
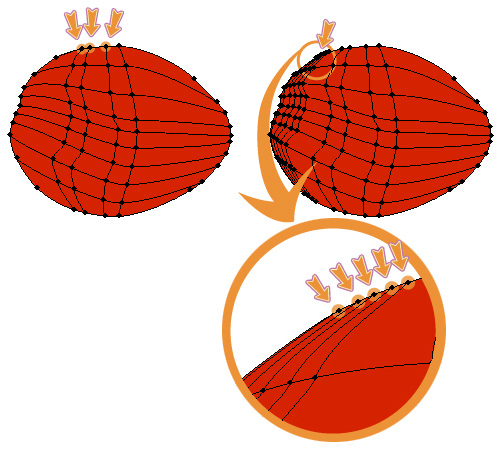
3. In the right side of the first vertical mesh line, click in the four spots indicated to get the last 4 vertical lines. At this point, you are done with the Mesh Tool (U) and all that is left to do is to adjust some of the handles in the areas where it is necessary.

4. In the image below you can see the main areas on the surface of the mango based on the color shades that I’ve used.
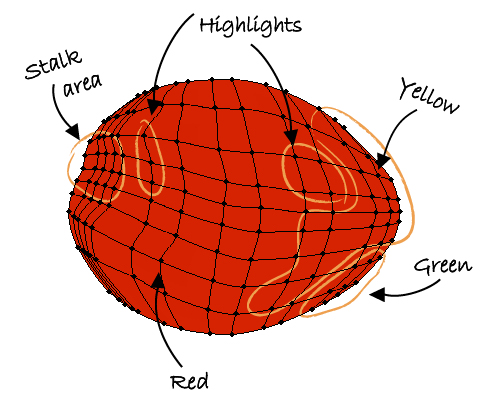
5. Taking into account the areas shown above, I chose the most important color shades used in order to exemplify. If you need all the colors, please check the Ai. file for reference because it would have been kinda difficult to indicate every color that I’ve used for all these points and also quite tedious.

Create the Texture
6. To make the Mango fruit look not artificial, we need to create a texture. Open the Symbol Libraries menu and under Artistic Textures find Charcoal. Drag it into your working area and press the Break Link to Symbol button. Having the resulting texture selected, from the fly-out menu of the Transform Panel choose Flip Vertical then scale it about 130%.

7. Put this texture over the mango (black) then make another copy (blue) and arrange it above the first one as in the next image. Now, select one of the textures, go to Effect menu > Warp and apply the Arc effect. The settings that I’ve used for the black and blue textures are shown below. At the end, select Expand Appearance from the Object menu for both.

8. At this step, you need the copy of the mango-shape drawn at the first step. Bring it in front then make another copy. Now, select one of them and also one of the textures and click Crop from the Pathfinder Panel. Do the same thing for the other texture using the second copy of the mango-shape.

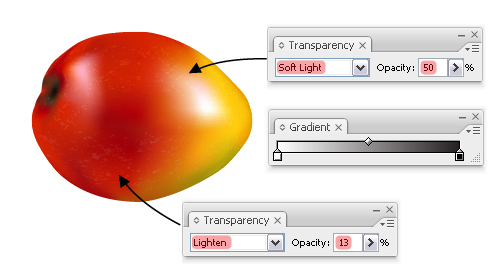
9. Fill the two texture groups with a linear gradient from white to black. Set the texture from the top to Soft Light and lower the Opacity to 50% then set the other one from the bottom to Lighten and reduce the Opacity to 13%. You are done with the mango for the time being.
Draw the Stalk of the Mango
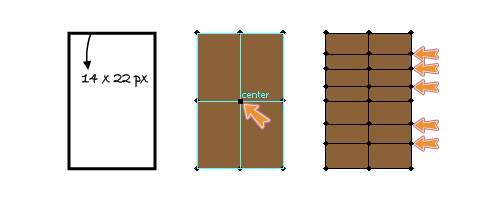
10. Let’s continue with the stalk of the fruit. Take the Rectangle Tool (M) and draw a rectangle having the dimensions shown then give it any fill color. Now, take the Mesh Tool (U) and add the first mesh point right in the center, which will also generate the first horizontal and vertical mesh lines. Above the horizontal line, add 3 more lines by clicking with the Mesh Tool (U) on the path as indicated. Then add two more lines under the first horizontal lines.
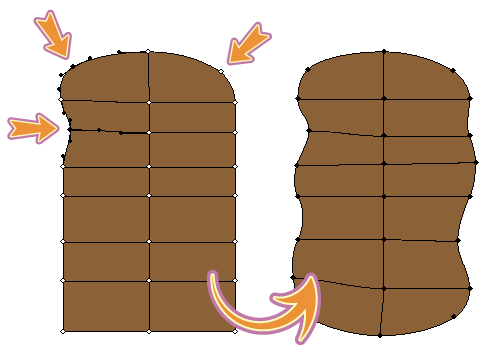
11. Now it’s time to shape the stalk. To obtain the wavy sides, simply select using the Direct Selection Tool (A) the mesh points individually and move them towards the inside and also move the handles if needed. For the corner points, you can use the Convert Anchor Point Tool (Shift+C) or the Convert selected anchor points to smooth option.
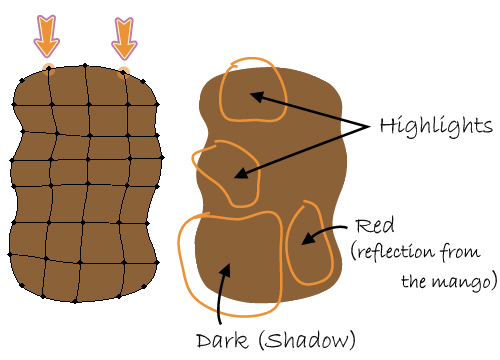
12. Use the Mesh Tool (U) to add other two vertical lines by clicking in the spots indicated, one on the left and one on the right side of the first vertical mesh line. The stalk-shape is ready and you can see in the image below the main areas that we will color next.
13. Select each mesh point individually from the highlight area, using the Direct Selection Tool (A) and change the colors following the numbers written next to each one. Continue with the other mesh points and use the colors indicated.
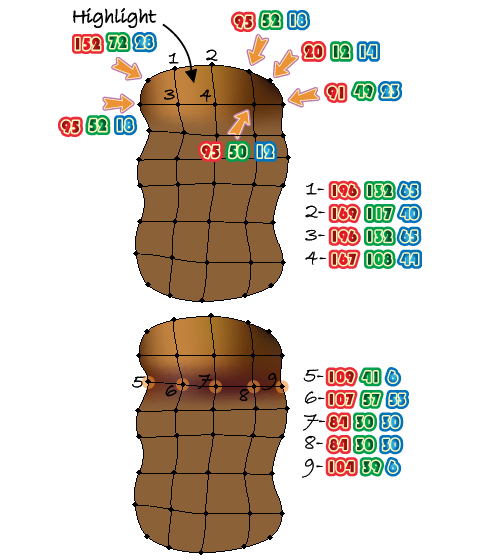
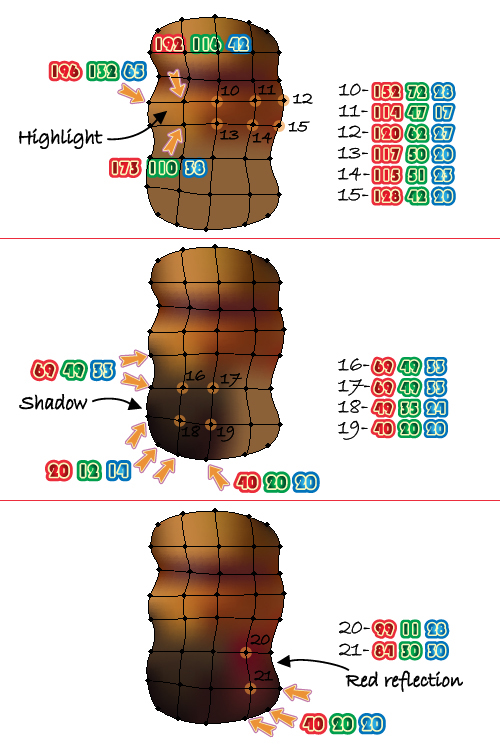
14. In the next image, you can see how to color all the other areas. Follow the numbers and the colors indicated to finish the stalk.
Draw the Leaf
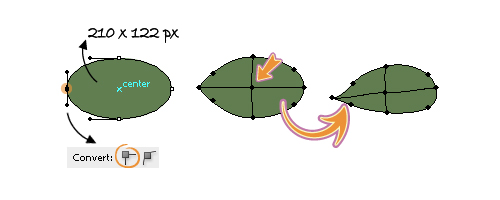
15. Take the Ellipse Tool (L) and draw an oval shape having the dimensions shown. Select only the left anchor point using the Direct Selection Tool (A) then press the Convert selected anchor points to corner option. Next, take the Mesh Tool (U) and click in the center of the shape to add the first horizontal and vertical mesh lines. By moving the points individually and also their handles you will obtain the leaf shape as in the image.
16. Next, take the Mesh Tool (U) and click on the existing vertical mesh line in the spots indicated to add the four horizontal lines. Zoom in to the middle area of the leaf and add two mesh points very close to the center point, one above and one under it, as shown in the close-up. As a result, you will get two new lines right next to the first horizontal mesh line.
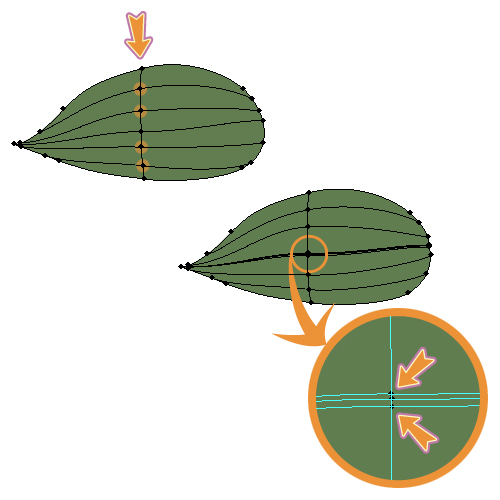
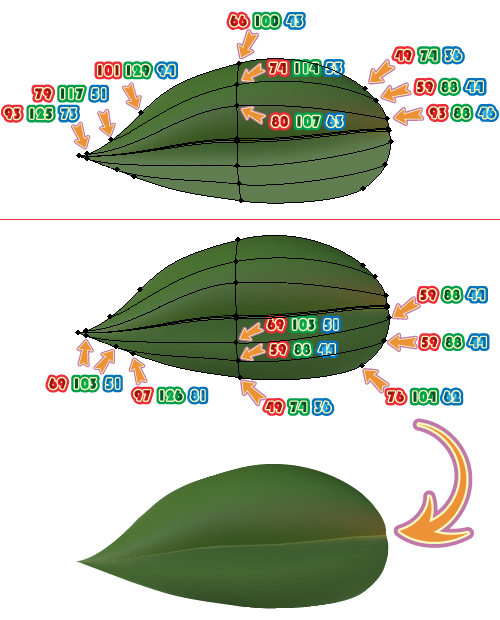
17. Follow the numbers and color each of the mesh points as indicated. You can see the result in the second part of the image.
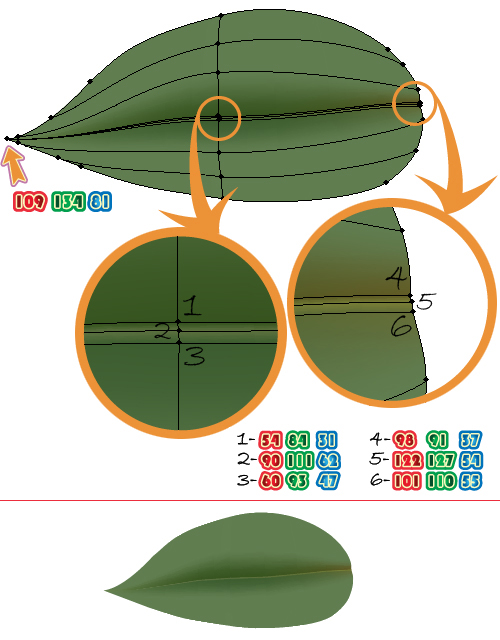
18. Continue with all the other points and finish the leaf.
Draw the Stem of the Leaf
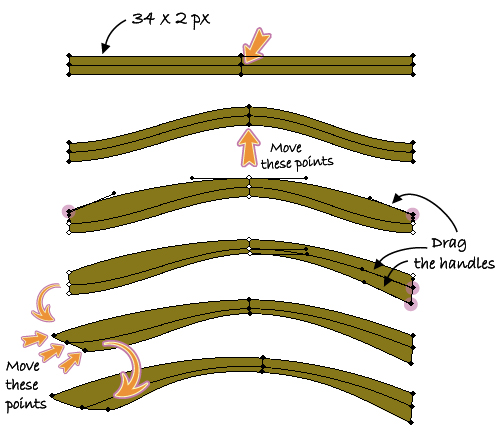
19. Start by drawing a 34×2 px rectangle then take the Mesh Tool (U) and click in the center. Using the Direct Selection Tool (A) select only the three points from the middle and move them up. Also using the Direct Selection Tool (A) select only the two top corner points and drag the handles as in the image. Do the same thing with the other two points indicated from the right side. Finally, move the three points from the left side as shown below.
20. Let’s add more mesh lines. Zoom to the middle area of the stem and click on the existing vertical line using the Mesh Tool (U) to add the two points, one above the center point and one under it. As a result you will get two more lines. Also click in the spot indicated on the left side to obtain a mesh line as in the image. The stem is ready and you can start coloring. Follow the numbers next to each mesh point and fill them with the colors indicated.
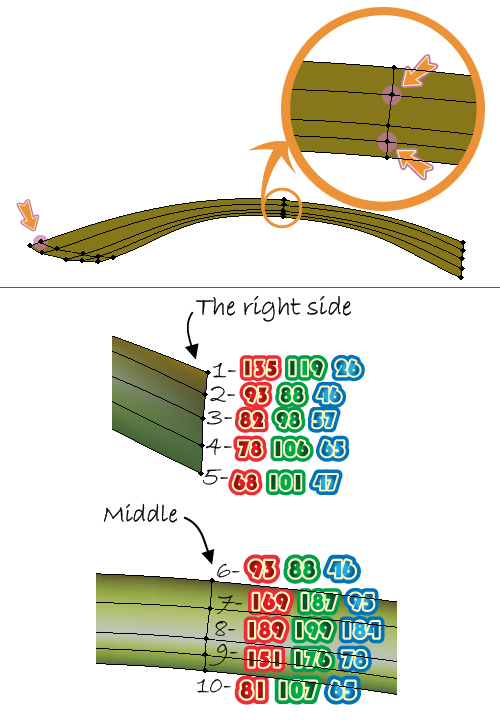
21. In the next image you can see the colors that I’ve used for the points on the left side of the stem. In the second part of the image you can see the final stem and now you can attach it to the leaf.
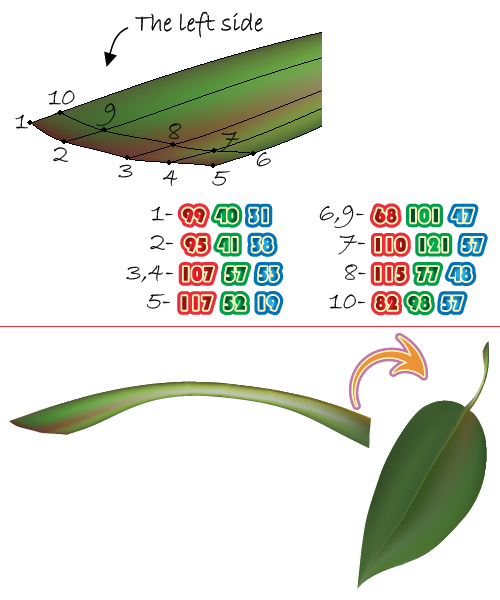
22. Place the stalk of the mango as in the next image then arrange the leaf and the fruit is ready.

Draw the Slice of Mango
23. First, use the Pen Tool (P) to draw a shape that looks like a slice of mango. Next, take the Add Anchor Point Tool (+) and add the four points, two on each side as shown in the image. The reason why we need to do this will become clear at the next step.

24. Use the Mesh Tool (U) to add the first mesh point very close to the top edge of the shape and you will get the first horizontal and vertical mesh lines. Zoom the right side and select using the Direct Selection Tool (A) only the mesh point indicated and move it over the point from the corner as shown in the close-up. Do the same thing to the other side.
Note: Without the points added at the previous step, at this point the bottom curve of the slice would have been distorted. We don’t want this to happen because the slice-shape must remain unaltered.
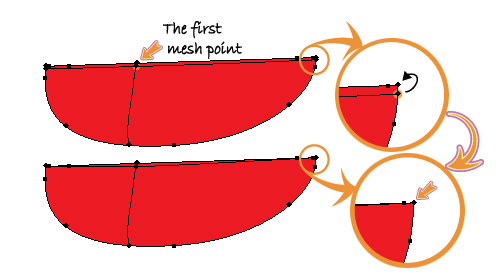
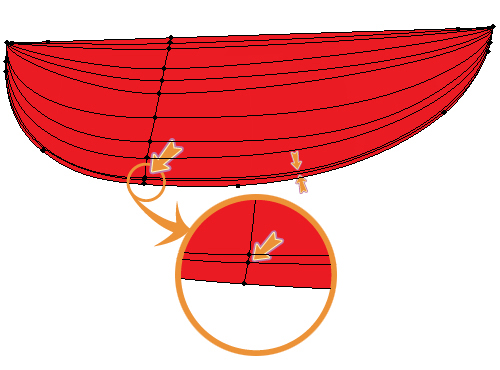
25. Take the Mesh Tool (U) and add another point very close to the first one. Using again the Direct Selection Tool (A) move the resulting points from the sides over the ones from the corner as you did at the previous step. Do the same thing three more times then continue up to the bottom. At the end all the horizontal mesh lines should look like in the image below, like they all would start from the top corners.

26. Zoom in the area indicated and add one more mesh point very close to the last one added at the previous step. This new line defines the edge between the pulp of the fruit and the skin.
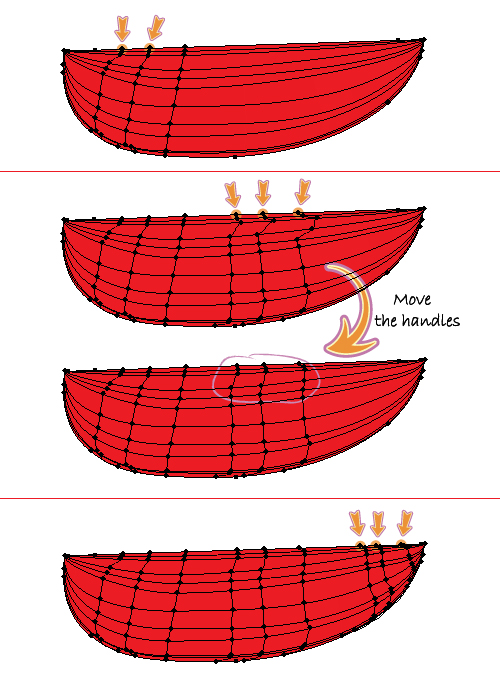
27. Let’s continue with the vertical mesh lines. Take the Mesh Tool (U) and click in the spots indicated to get the two lines on the left side then add the other three mesh lines. At this point you can adjust the handles of some of the points if needed to obtain smoother lines, as shown in the second part of the image. When you are done, add the last three lines on the right side by clicking in the spots indicated and the slice is ready to be colored.
28. First, take the Direct Selection Tool (A) and drag the cursor over all the points from the top left corner and color them using the shade of yellow indicated. Do the same thing on the right side. In this case also, I chose only the main colors that I’ve used in order to give you an example on how to color it. The mesh points are too many therefore please check the Ai file if you need all the colors.

Final Image
Here is the final image. Let me know what you think of the tutorial. Hope you like my mango.


No comments:
Post a Comment
Note: Only a member of this blog may post a comment.