
The Perspective tools in Illustrator CS5 make it a lot easier to draw in perfect one, two or three-point perspective. Using symbols in conjunction with the Perspective tools will make quick work of this stylized cityscape.
Republished Tutorial
Every few weeks, we revisit some of our reader's favorite posts from throughout the history of the site. This tutorial was first published in April of 2011.
Step 1
Click the Perspective Grid Tool. Two things appear on your artboard: The Perspective Grid and the Active Plane Widget. You can change the placement of the Widget by double-clicking on the Perspective Grid Tool to bring up its options. The Widget can only be placed in one of the four corners — you can't move it freely.
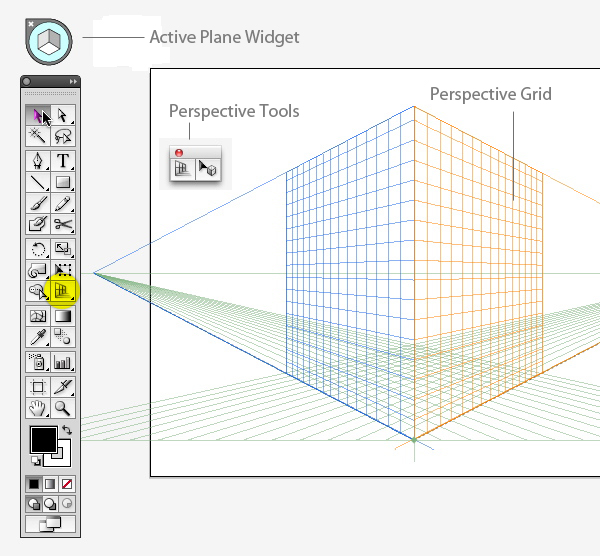
A basic 2-point grid is the default setting. If you don't see something like the grid above, go to View > Perspective Grid > Two Point Perspective and choose the Normal preset.
Using the Perspective Grid tool, move the Horizon line down, close to the ground level. This will give a dramatic perspective with exaggerated vanishing points.

If you want, you can save this grid as a preset to use for future illustrations. Go to View> Perspective Grid > Save Grid as Preset to do so.
Step 2
If you're new to the Perspective tools, get a feel for how they work by drawing a few shapes in perspective. First, make sure the grid is visible and click the left plane (dark blue) on the Widget. Now take the Rectangle Tool (M) and draw on the left plane. Your rectangle will be drawn in perspective, fixed to the grid. Notice that the cursor crosshairs now have a left-facing arrow next to it.
This is a visual cue that lets you know which plane is active as you draw. Now Switch to the Perspective Selection Tool (Shift + M) and move the rectangle. You'll see that the rectangle's corner points are solid, rather than hollow, and look heavier than normal ones, indicating that the shape is in perspective. As you move it, the object will stay in perspective, even if you move it off the visible grid.

Step 3
Select the right plane (Orange) and draw another rectangle. Line it up with the first one, and you have the basic structure of a building in perspective.

You can now add elements, such as windows, by drawing a smaller rectangle and drag-copying it — with the Perspective Selection tool — several times to make a row (or drag out one copy, then press Command + D to make a few more). All subsequent copies will remain in perspective.

Step 4
You could continue drawing more rectangles and lining them up on either plane, but that can get tedious. A faster method is to construct the buildings flat (i.e., not in perspective), then make them into symbols, then place them on the grid.
Choose a lighter and darker variation of one color (I'm partial to orange), and make some simple building shapes. You'll enhance these later with gradients, but for now, keep it basic. Make one set that's lighter, and another version with the darker color. These will be used for the light side of the illustration, and the building facades that are in shadow, respectively.

Step 5
Drag each building into the Symbols panel. You can give each one a name if that helps you keep track of them— it can be hard to tell when you're looking at them in thumbnail view.

Step 6
Drag out a "lighter" symbol to the art board. Make sure the Left Plane is active, and using the Perspective Selection tool (Shift + V), drag the symbol into place. You'll see that it snaps to perspective. Do this a few more times, keeping the lighter buildings on the left plane.
Do the same with the darker building symbols, placing them on the right plane. Choose the plane on the widget, or press "3" to activate it.

Step 7
If you have a light and dark building shape placed where the two planes intersect, you'll notice that each side matches up. But if you try to add a dark side to a light shape that's further to the left of the intersection point, the new shape won't line up. The is because if you drag an object that's in perspective on the right plane, and try to match it up to one the right, the left shape will grow in size as you drag, because it continues to adhere to the perspective grid.
So what you need to do is drag that shape perpendicularly, in perspective.
Select the shape with the Perspective Selection tool, hold down the '5' key and drag it to the left. A line indicates that you are dragging perpendicularly.

Step 8
Continue constructing buildings this way, until each facade has a matching side. You'll probably have to send some shapes behind others, which you can do without affecting the perspective.

Step 9
Once all the buildings are arranged to your liking, zoom in and make sure each side of each building is lined up neatly. They do not have to align to a grid line, but if you nudge an object with the arrow keys, it will snap to the nearest one.

Step 10
To give the illustration some polish, add gradients to each building shape. To do this, you must first release the shapes from the Perspective Grid. Select a shape and go to Object > Perspective > Release with Perspective. This will break the link to the Symbol, so you can now change the appearance of each object.

Step 11
Create a set of gradients that are made up of your two original colors, with a darker and lighter color in each. As you color the shapes, use the gradients to enhance the sense of depth in the cityscape. Visualize the light source and color the buildings accordingly, while maintaining a cohesive look.
Applied carefully, gradients can also add depth and interest to the windows and details of the buildings.

Step 12
Now we'll make the reflection. Create a new layer below the first layer. Select the entire cityscape, and click the little colored square in the Layers panel. Hold down the Alt key, then drag the square down to the new layer. This will create a copy of the objects on the bottom layer. Lock or hide the top layer.

Step 13
With the copy still selected, double-click the Reflect Tool and reflect the objects horizontally. Drag the reflected copy down, so that it's just below the original. This will be the reflection.

Step 14
To simplify the reflection and make it less distracting, delete all the details on each building. This is kind of a chore, but you can make it easier by viewing the reflection in Outline mode and selecting multiple windows and other details with the Direct Selection Tool (A), and/or the Lasso Tool (Q).

Step 15
Since the cityscape is a perspective drawing, making the reflection isn't as easy as simply flipping the shapes and placing them below the original. Select just one half of the reflection. Choose the Free Transform Tool (E), then grab the outer side of the selected objects, and drag it up, while holding down the Command key. Add the Shift key to keep the transformation aligned vertically. It can be a bit tricky to master this finger dance, but after a few tries, you'll get the hang of it. Skew the refection until it meets the main cityscape shape. Do the same with the other half.

Step 16
When you are satisfied with the skewed halves, draw a rectangle that covers the entire reflection. Fill this rectangle with a black to white linear gradient, as in the image below.

Step 17
Select the rectangle and the reflection objects. In the Transparency panel, click the flyout menu and choose Make Opacity Mask. The reflection should now appear to fade out. If not, try clicking Invert Mask in the panel.

Step 18
If necessary, adjust the fade-out by editing the gradient. Click on its thumbnail in the Transparency panel and adjust it with the Gradient tool.


Step 19
Nudge the reflection up or down if necessary. Then sit back and admire your shining city!
Conclusion
Before the Perspective tools were introduced in CS5, it was entirely possible to make an illustration such as this one, but you had to carefully measure and plot your own grid. Creating such a grid could take as long as it did to make the rest of the illustration. The Perspective toolset eliminates the need for all that time-intensive preparation, and allows you to concentrate on the creative part of illustrating.


No comments:
Post a Comment
Note: Only a member of this blog may post a comment.