Undertake Technical Adjustment of Images
There are two ways to create colours
Human race loves to fiddle with everything and colour is no exception.
During our exploration of colour theory, we’ve found there are two ways to go about colour creation: by mixing light (or additive) or by mixing paint on paper (subtractive).
Mixing light, or additive model, is perhaps the most intuitive one. It allows you to create colours by mixing red, green and blue light sources in various intensities. The more light you add, the brighter the colour mix becomes, which is the reason this mixing process is called “additive”.
Essentially, this is the way we physically perceive colours, and the way we are accustomed to mixing colours through RGB computer model.


 Colours are mixed either by combining light sources, or paint on paper.
But just a few decades ago, subtractive colour mixing was the norm and it’s still being taught at art schools. In this case, “subtractive” simply refers to the fact that you subtract the light from the paper by adding more colours.
Traditionally, the primary colours used in subtractive process were red, yellow and blue, as these were the colours painters mixed to get all other hues. As printing emerged, they were subsequently replaced with cyan, magenta, yellow and black (CMYK), as this colour combo enables printers to produce a wider variety of colours on paper.
So when you think about it, additive and subtractive colour models are just two sides of the same coin, or two ways to think about the same thing – making colours.
No single device is capable of reproducing all visible colours
“A device that is able to reproduce the entire visible colour space is an unrealized goal within the engineering of colour displays and printing processes”.
This is how Wikipedia explains this problem and if you ever had issues trying to match colours on screen with those on paper, you probably have your own words for it.
Technically speaking, every device and printing process has its own colour gamut, or a set of colours it can successfully reproduce.
In other words, your colour
options are limited depending on what you’re working with.
If you’re using RGB screens, you can mix some very bright and saturated colours. If you have to print that out, your options get reduced to a limited colour spectrum of a CMYK printer. And, if you saw a brochure printed with a beautiful Pantone colours, you’ll never be able to find them on screen – they simply cannot be reproduced by RGB monitor.
So there you go – different devices, different colours. You’ll never be able to match them perfectly but you can do a lot with some basic colour management.
We describe colours using colour models
“Teal blue” and “Fuxia” are great when you’re talking about sweaters but having a colour name for millions of colours we use today would be hardly practical.
That’s why we invented colour models or standards which help us describe colours.

The CMYK model.
This is standard subtractive, printing colour model. Each colour is represented by a corresponding value of cyan, magenta, yellow and black inks, on a scale from 0% to 100%.
Colour wheel is (so far) the best way to think about colours.
First invented by Sir Isaac Newton and later improved by countless others, colour wheel shows how primary colours blend to create other distinct hues.

Traditionally, the colour wheel consists of:
Primary colours: Typically Red, Yellow and Blue.
Secondary colours: Green, orange and purple hues created by mixing primary colours
Tertiary colours: Further colour hues you get by mixing a primary colour with a secondary colour.
Colour Management
In digital imaging systems, colour management is the controlled conversion between the colour representations of various devices, such as image scanners, digital cameras, monitors, TV screens, film printers, computer printers, offset presses, and corresponding media.
CMYK is used for printing

RGB for devices and web


Many other imaging chains exist, but in general, any device which attempts to reproduce colour can benefit from colour management.
For example, with photography it is often critical that your prints or online gallery appear how they were intended. Colour management cannot guarantee identical colour reproduction, as this is rarely possible, but it can at least give you more control over any changes which may occur.
Explain the reasons for using different file formats for digital images, identifying the differences between them
Explain the principles of
- Colour theory
- Colour mode
- Colour management
There are two ways to create colours
Human race loves to fiddle with everything and colour is no exception.
During our exploration of colour theory, we’ve found there are two ways to go about colour creation: by mixing light (or additive) or by mixing paint on paper (subtractive).
Mixing light, or additive model, is perhaps the most intuitive one. It allows you to create colours by mixing red, green and blue light sources in various intensities. The more light you add, the brighter the colour mix becomes, which is the reason this mixing process is called “additive”.
Essentially, this is the way we physically perceive colours, and the way we are accustomed to mixing colours through RGB computer model.


But just a few decades ago, subtractive colour mixing was the norm and it’s still being taught at art schools. In this case, “subtractive” simply refers to the fact that you subtract the light from the paper by adding more colours.
Traditionally, the primary colours used in subtractive process were red, yellow and blue, as these were the colours painters mixed to get all other hues. As printing emerged, they were subsequently replaced with cyan, magenta, yellow and black (CMYK), as this colour combo enables printers to produce a wider variety of colours on paper.
So when you think about it, additive and subtractive colour models are just two sides of the same coin, or two ways to think about the same thing – making colours.
No single device is capable of reproducing all visible colours
“A device that is able to reproduce the entire visible colour space is an unrealized goal within the engineering of colour displays and printing processes”.
This is how Wikipedia explains this problem and if you ever had issues trying to match colours on screen with those on paper, you probably have your own words for it.
Technically speaking, every device and printing process has its own colour gamut, or a set of colours it can successfully reproduce.
If you’re using RGB screens, you can mix some very bright and saturated colours. If you have to print that out, your options get reduced to a limited colour spectrum of a CMYK printer. And, if you saw a brochure printed with a beautiful Pantone colours, you’ll never be able to find them on screen – they simply cannot be reproduced by RGB monitor.
So there you go – different devices, different colours. You’ll never be able to match them perfectly but you can do a lot with some basic colour management.
We describe colours using colour models
“Teal blue” and “Fuxia” are great when you’re talking about sweaters but having a colour name for millions of colours we use today would be hardly practical.
That’s why we invented colour models or standards which help us describe colours.

Using HSB colour model in Photoshop will make working with colour
easier, as this colour model was invented to help people work more intuitively.
The RGB model
By far the most “popular” additive colour model. Each colour is described as set of Red, Green and Blue values on a scale from 0 to 255.
The HSB model (or HSL / HSV)
This colour model is based on RGB but is better suited to artists and designers. Each colour is described as a combination of Hue, Saturation and Brightness values which allows for quick and intuitive colour choices.
For example, in HSB model, making an orange colour brighter or darker is a matter of playing with the Brightness slider. In RGB model, you’d have to move around all sliders to find a darker tone of the same colour, with no clear idea on what you need to do.
The CMYK model.
This is standard subtractive, printing colour model. Each colour is represented by a corresponding value of cyan, magenta, yellow and black inks, on a scale from 0% to 100%.
Colour wheel is (so far) the best way to think about colours.
First invented by Sir Isaac Newton and later improved by countless others, colour wheel shows how primary colours blend to create other distinct hues.

Left: traditional (Newtonian) colour wheel consisting of 12 hues created
by mixing three primary colours. Right: a fancy computer generated colour wheel
based on same principles.
Traditionally, the colour wheel consists of:
Primary colours: Typically Red, Yellow and Blue.
Secondary colours: Green, orange and purple hues created by mixing primary colours
Tertiary colours: Further colour hues you get by mixing a primary colour with a secondary colour.
Colour Management
In digital imaging systems, colour management is the controlled conversion between the colour representations of various devices, such as image scanners, digital cameras, monitors, TV screens, film printers, computer printers, offset presses, and corresponding media.
CMYK is used for printing

RGB for devices and web


Many other imaging chains exist, but in general, any device which attempts to reproduce colour can benefit from colour management.
For example, with photography it is often critical that your prints or online gallery appear how they were intended. Colour management cannot guarantee identical colour reproduction, as this is rarely possible, but it can at least give you more control over any changes which may occur.
Explain the reasons for using different file formats for digital images, identifying the differences between them


| Explain the importance of technical compatibility in images with specified requirements Depending on what you are producing whether its for print or for web, different devices sizes and resolution, colour mode you need to use the most appropriate file format to make sure the image is technically compatible.  File format
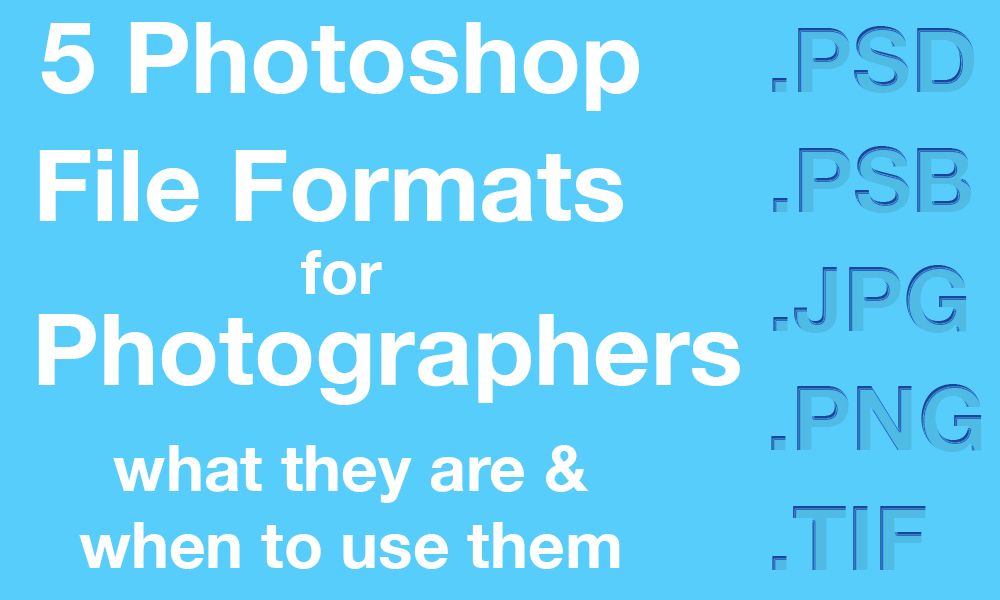
Images can be saved in a variety of file formats. Different file formats exist because some are better at certain tasks than others.
Graphics packages allow the user to save their work in compatible file formats that can be used in a variety of software programs - eg .jpg, .gif, .tiff. Most digital cameras automatically save photographs as .jpg.
JPG - Joint Photographic Group (pronounced 'Jay peg')
The JPG is probably the most common file format now in use for storing digital images, especially on the web. It is ideal for images that use more than 256 colours, such as digital photographs.
When you save an image using this format, some of the data is lost because the file is compressed. JPG files can be saved at various quality settings which are measured as a percentage of the original quality. The lower the quality percentage, the higher the compression rate; therefore if storage space is an issue, you should aim to save your JPG file at 30 per cent quality.
The table below shows a photograph that has been saved as a JPG and a GIF.
The many colours of this digital photo have been preserved through saving it as a JPG. It was saved at a 30 per cent quality setting and has a file size of 7kb.
When saved as a GIF using 32 colours, the image is quite patchy and some of the colours are missing. It also has a much larger file size - this time it's 11kb.
GIF - Graphics Interchange Format (pronounced 'giff')
Like the JPG, the GIF file format is commonly used on the web. It is ideal for images that have large blocks of a single colour, and it can support up to a maximum of 256 colours. Unlike with JPGs, it is possible to alter the background colour of a GIF to make it transparent. This makes it possible to place it over other images or on webpages.
When you save an image as a GIF, you can decide how many colours to use - 256 colours is the maximum amount and 2 is the minimum (black and white). The fewer colours you use, the smaller the file size will be.
The table below shows a logo graphic that has been saved both as a GIF and as a JPG.
The logo uses few colours only, so is ideal to save as a GIF. In this case, it has been saved using 128 colours and is 3.5kb in file size. When saved as a JPG at a 30 per cent quality setting, the logo is slightly fuzzy and dull. It is also bigger in file size, at 5kb.
TIFF - Tagged Image File (pronounced 'tiff')
Like a JPG, a TIFF file can be compressed to reduce the file size, while still maintaining a high degree of image detail. Alternatively, it can be saved without compression to retain 100 per cent of the original image taken - where each pixel is identical to the original image taken. Like a GIF, you can also save it with a transparent background.
BMP - Bit-mapped
This is an appropriate file format for Windows users. It is used for general storage purposes - such as when images are awaiting editing - or as wallpaper for a Windows desktop. BMPs aren't really suitable for Macintosh computers or the web. BMP images are large files that require a lot of storage space because no effort is made to reduce the file size.
 | |||||||||||||||||||||
| 1.3 | Explain the effect of image pixel dimensions, resolution and bit depth on file size
Pixels, bit depth
and graphic file size
Digital images are composed of very
small picture elements—called pixels—lined up in rows and columns.
The size, colour and brightness of each pixel determine how the image appears
on the computer monitor or printer. Because pixels are the smallest picture
elements, the pixel size determines how much detail will appear in the image:
the smaller the pixels, the more pixels can appear in a given area, which
results in higher resolution.

Therefore, the greater the
resolution, the more the number of pixels, and the larger the image file has to
be. When the resolution is very low, it results in loss of image information
and inaccurate representation of the original image. On the other hand, too
high a resolution increases the file size and may not necessarily provide
valuable information to the viewer. Large files are also more difficult to
change because they take longer to be transmitted or load onto a web page.
Bit depth
Bit depth represents the number of
values available to define each pixel. Eight-bit images can display 256
possible values for each pixel, 16–bit images can display 65,536 possible
values and 24–bit images 16,777,216 possible values. Because bit depth is information
associated with each pixel, the greater the bit depth, the larger the image
file. The human eye has its limitations, so excessive bit depth wastes memory
space in digital imaging.
Resolution
Resolution refers
to the dots of ink or electronic pixels that make up a picture when it is
printed on paper or displayed on-screen.
 Measures of resolution PPI (pixels per inch) A digital image is composed of samples that the screen displays in pixels. The PPI is display resolution. How an image looks on screen is determined by the resolution of the monitor. A high-resolution setting displays more pixels per inch. DPI (dots per inch) is a measure of the resolution of a printer referring to how many dots of ink or toner a printer can place within an inch (or centimetre). DPI is printer resolution. Print and screen resolution A printer’s dot is over 300 to 1000% smaller that a pixel on a monitor. This is why images made for the web are not suitable for printing. A high resolution image can always be downsized/compressed for the web. But a magnified image never looks good when printed. Although we can print images with a higher resolution than that displayed on most monitors, the screen resolution represents the “useful” resolution. Computer monitors typically display images at 72 or 96 PPI. Much less sampling (SPI) is needed for on-screen display and the information in images beyond 96 SPI is wasted, will not enhance the display, and unnecessarily increases the file size and download time. About pixel dimensions and printed image resolution Pixel dimensions measure the total number of pixels along an image’s width and height. Resolution is the fineness of detail in a bitmap image and is measured in pixels per inch (ppi). The more pixels per inch, the greater the resolution. Generally, an image with a higher resolution produces a better printed image quality. | ||||||||||||||||||||

Same image at 72‑ppi and 300‑ppi; inset
zoom 200%
| |||||||||||||||||||||
| Explain the importance of having accurate technical and descriptive metadata "Descriptive metadata refers to information that supports discovery and identification of a resource (the who, what, when and where of a resource). It describes the content of the resource, associates various access points, and describes how the resource is related to other resources intellectually or within a hierarchy. In addition to bibliographic information, it may also describe physical attributes of the resource such as media type, dimension, and condition. Descriptive metadata is usually highly structured and often conforms to one or more standardised, published schemes, such as Dublin Core or MARC. Controlled vocabularies, thesauri, or authority files are commonly used to maintain consistency across the assignment of access points. Descriptive information is usually stored outside of the image file, often in separate catalogues or databases from technical information about the image file."  Identify the relative merits of appropriate equipment, software, methods and material for different imaging requirements          | |||||||||||||||||||||
Identify aspects of codes of ethics/conduct relevant to technical adjustment of images      | |||||||||||||||||||||


No comments:
Post a Comment
Note: Only a member of this blog may post a comment.