Thursday, November 1, 2018

The difference between Cluster groups and segmentation

The Difference Between Segmentation and Clustering.

 Segmenting is the process of putting customers into groups based on similarities,
 and clustering is the process of finding similarities in customers so that they can be grouped, and therefore segmented. They seem quite similar, but they are not quite the same.
Customer Segmentation via Cluster Analysis

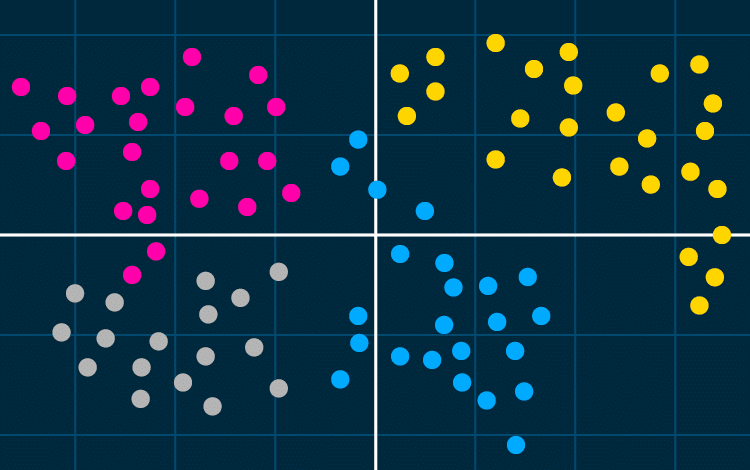
Cluster analysis uses mathematical models to discover groups of similar customers based on the smallest variations among customers within each group.

What is Cluster Analysis?

In the context of customer segmentation, cluster analysis is the use of a mathematical model to discover groups of similar customers based on finding the smallest variations among customers within each group. These homogeneous groups are known as “customer archetypes” or “personas”.
The goal of cluster analysis in marketing is to accurately segment customers in order to achieve more effective customer marketing via personalization. A common cluster analysis method is a mathematical algorithm known as k-means cluster analysis, sometimes referred to as scientific segmentation. The clusters that result assist in better customer modeling and predictive analytics, and are also are used to target customers with offers and incentives personalized to their wants, needs and preferences.
The process is not based on any predetermined thresholds or rules. Rather, the data itself reveals the customer prototypes that inherently exist within the population of customers.

What about Threshold/Rule-based Segmentation?

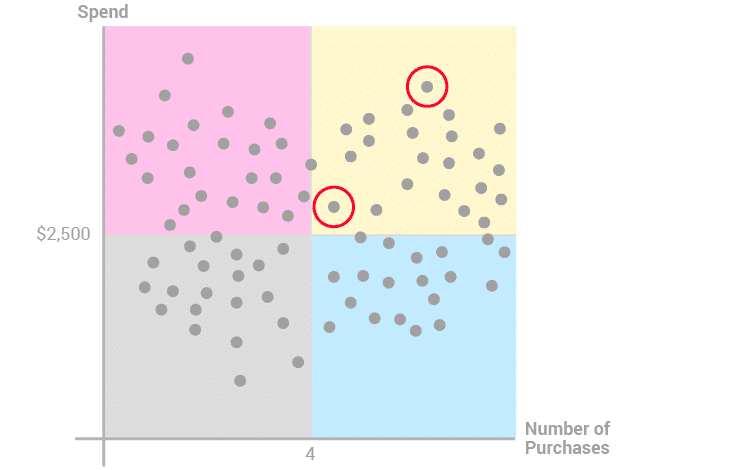
In threshold (or rule-based) segmentation approaches, the marketer selects a priori thresholds, typically in two dimensions, and divides the customers accordingly.
The disadvantages of this approach include:
  • Thresholds are predetermined, leading to results that usually meet initial assumptions, as opposed to allowing the data itself to reveal the most meaningful divisions among the particular customer base being analyzed.
  • There will be very large variances among the customers found in each segment.
  • It is very difficult to perform the segmentation in more than two dimensions.
The following example illustrates why this segmentation approach is weak. Note the two highlighted customers – even though their purchase patterns are significantly different, they have both been included in the “yellow” segment.
Customer Segmentation

The Advantages of Cluster Analysis for Customer Segmentation

As compared with threshold/rule-based segmentation, the three main advantages of the analytical segmentation approach represented by cluster analysis are:
  • Practicality – It would be practically impossible to use predetermined rules to accurately segment customers over many dimensions
  • Homogeneity – Variances within each resulting group are very small in cluster analysis, whereas rule-based segmentation typically groups customers who are actually very different from one another.
  • Dynamic clustering – The clusters definitions change every time the clustering algorithm runs, ensuring that the groups always accurately reflect the current state of the data.
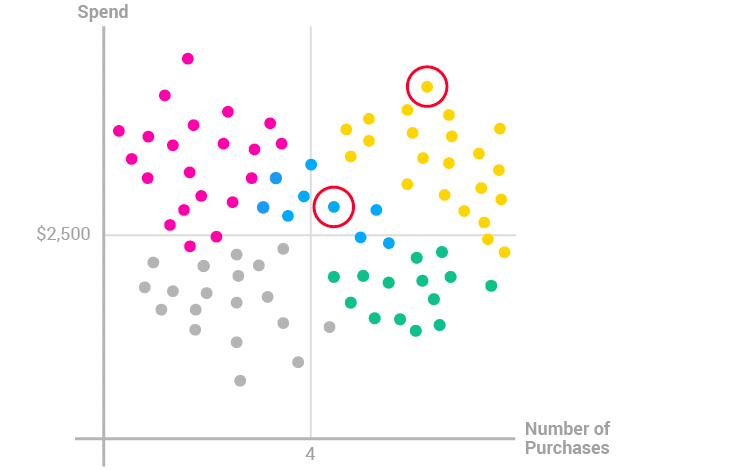
In the following diagram, we see that cluster analysis identified five distinct customer personas in the same data set as above (the dots representing customers in each persona are colored differently). The customers within in each persona are very similar to one another and significantly different than those in other personas. In other words, each persona tells a different customer story.
Cluster Analysis Customer Segmentation
Unlike when the same customer sample was analyzed by threshold/rule-based segmentation, the same two highlighted customers are now properly segmented into different marketing clusters, or personas.

Sample Customer Cluster Analysis Result

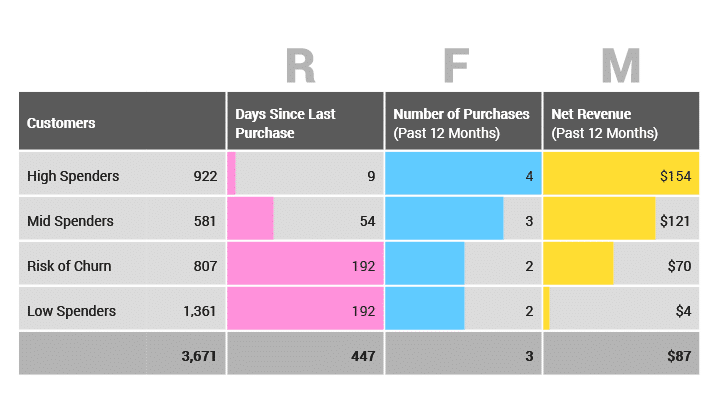
The following chart shows the results of a three-dimension cluster analysis performed on the customer base of an e-commerce site. This analysis resulted in the discovery of four customer personas.
RFM Segmentation
Once the store’s marketers have a clear view of the various customer personas, they are able to relate differently to each persona, with the marketing interactions most relevant to each persona’s product preferences.
In other words, the distinct customer personas discovered by cluster analysis allow marketers to model their customers and personalize marketing efforts for much greater effectiveness.

Closing the Cluster Analysis Marketing Loop

Because customer behavior changes frequently, performing cluster-based segmentation only once in a while is not sufficient. Ideally, it should be performed daily, taking advantage of all the latest customer behavioral and transactional data. For most online businesses, this means identifying dozens or hundreds of different personas that can be independently targeted by marketers. This, of course, is not something that can be easily done manually; rather, an automated system should be employed to ensure that the entire customer base is accurately segmented into relevant personas every day.
The next ingredient is connecting the discovered customer personas with the most relevant marketing interactions for each one. These interactions should cater to the specific wants, needs and preferences of each small, homogeneous group of customers represented by each persona. Marketing creativity must be mated with an automated multi-channel marketing execution system that will allow marketers to address any number of different personas with any number of different marketing campaigns, every single day.
Finally, there needs to be a measurement and optimization cycle in place. By scientifically measuring the results of each campaign in terms of monetary uplift, marketers can know which campaigns are working well and which ones need improvement. The end result will be highly relevant marketing communications – leaving no customer behind – that generate long-term customer loyalty, improved brand perception and maximum customer value.

Design Principles

https://www.pinterest.co.uk/nevison1086/design-principals/


Wednesday, October 31, 2018

Making clipping Masks in Illustrator

HOW TO MAKE A CLIPPING MASK IN ADOBE ILLUSTRATOR


HOW TO MAKE A CLIPPING MASK IN ADOBE ILLUSTRATOR

POSTED ON

A clipping mask is a design tool that not many people know about, but it has the potential to take your designs to the next level. It can spice up a simple piece of text, add beautiful patterns to a standard image, and add a little oomph to even the most basic shape. And the best part is that making a clipping mask is quick and simple.
So what exactly is a clipping mask? It’s an object that masks (or hides) other artwork, so that you can only see the artwork inside the shape. Essentially it is like taking a window and placing it in front of a scene, so that you can only see the scene through the window. This window can be in any form – text, hand drawn shapes, simple shapes, anything you can think of. And the scene can be anything – from a photograph to an interesting pattern. Below I’ve got a few different examples of clipping masks you can make.

HOW DO YOU MAKE A CLIPPING MASK?

Now to the nitty gritty – how do you make a clipping mask in Adobe Illustrator? Though the finished product looks pretty complex and fancy, the process is actually really simple. Here are the steps on how to make a clipping mask. If you’d like to watch a video rather than reading through this tutorial you can scroll down and follow the steps in the video at the bottom of this post!

STEP 1

The first step is to bring in the image that you want to clip from, or the background that you want to display. This could be a photograph or a pattern image, or even a pattern that you created yourself. Then just copy and paste it onto the artboard (the workspace in Adobe Illustrator).

STEP 2

Create the image that you want to clip to. This is the text or shape that you want the background to show through.
If what you are clipping to is text, then type the text as you want it to appear. Then once you have it the way you want, you need to convert it to outlines. Go to the menu Type > Create Outlines. Then you need to make the type a compound path, which makes illustrator see all the separate letters as one big image. To do this you can press Command + 8 or go to Object > Compound Path > Make.
If what you are clipping to is a shape, then you do not need to create outlines, since the shape is already an outline. However, if the shape is a group of shapes, you still need to make a compound path so that they appear as one large shape. Just select all the shapes and press Command+8 or go to Object > Compound Path > Make.
If what you are clipping has a stroke, you first need to turn the stroke into a shape by clicking Object > Path > Outline Stroke. Then you need to make a compound path by pressing Command+8 or go to Object > Compound Path > Make.

STEP 3

Now make the actual mask. First, make sure that the background image is in back, and the clipping is in the front. Then you select both and press Command + 7 or Object > Clipping Mask > Make. This will make the background shape disappear, and you will see that image only where the front shape was.

STEP 4

That’s it! But, if for some reason you want to edit the mask – maybe the part of the pattern you loved isn’t showing through or the picture isn’t in the right place – you just go to Object > Clipping Mask > Edit Contents and then you can move the background image so that the exact part you want shows through the clipping.


How to write a risk assessment

WHAT ARE THE FIVE STEPS TO RISK ASSESSMENT?

The Health and Safety Executive (HSE) advises employers to follow five steps when carrying out a workplace risk assessment:
Step 1: Identify hazards, i.e. anything that may cause harm.
Employers have a duty to assess the health and safety risks faced by their workers. Your employer must systematically check for possible physical, mental, chemical and biological hazards.
This is one common classification of hazards:
  • Physical: e.g. lifting, awkward postures, slips and trips, noise, dust, machinery, computer equipment, etc.
  • Mental: e.g. excess workload, long hours, working with high-need clients, bullying, etc. These are also called 'psychosocial' hazards, affecting mental health and occurring within working relationships.
  • Chemical: e.g. asbestos, cleaning fluids, aerosols, etc.
  • Biological: including tuberculosis, hepatitis and other infectious diseases faced by healthcare workers, home care staff and other healthcare professionals.
Step 2: Decide who may be harmed, and how.
Identifying who is at risk starts with your organisation's own full- and part-time employees. Employers must also assess risks faced by agency and contract staff, visitors, clients and other members of the public on their premises.
Employers must review work routines in all the different locations and situations where their staff are employed. For example:
  • Home care supervisors must take due account of their client's personal safety in the home, and ensure safe working and lifting arrangements for their own home care staff.
  • In a supermarket, hazards are found in the repetitive tasks at the checkout, in lifting loads, and in slips and trips from spillages and obstacles in the shop and storerooms. Staff face the risk of violence from customers and intruders, especially in the evenings.
  • In call centres, workstation equipment (i.e. desk, screen, keyboard and chair) must be adjusted to suit each employee.
Employers have special duties towards the health and safety of young workers, disabled employees, nightworkers, shiftworkers, and pregnant or breastfeeding women.
Step 3: Assess the risks and take action.
This means employers must consider how likely it is that each hazard could cause harm. This will determine whether or not your employer should reduce the level of risk. Even after all precautions have been taken, some risk usually remains. Employers must decide for each remaining hazard whether the risk remains high, medium or low.
Step 4: Make a record of the findings.
Employers with five or more staff are required to record in writing the main findings of the risk assessment. This record should include details of any hazards noted in the risk assessment, and action taken to reduce or eliminate risk.
This record provides proof that the assessment was carried out, and is used as the basis for a later review of working practices. The risk assessment is a working document. You should be able to read it. It should not be locked away in a cupboard.
Step 5: Review the risk assessment.
A risk assessment must be kept under review in order to:
  • ensure that agreed safe working practices continue to be applied (e.g. that management's safety instructions are respected by supervisors and line managers); and
  • take account of any new working practices, new machinery or more demanding work targets.

HOW SHOULD MY EMPLOYER DEAL WITH HAZARDS?

The basic rule is that employers must adapt the work to the worker. The key aims of risk assessment are to:
  • prioritise the risks – i.e. rank them in order of seriousness; and
  • make all risks small – the two main options here are to:
    • eliminate the hazard altogether; or
    • if this is not possible, control the risks so that harm is unlikely.
The Management of Health and Safety at Work Regulations 1999 set out safety management guidance for employers for tackling risks, which you can find in schedule 1 (General Principles of Prevention). The basic approach is also known as a 'hierarchy of control' because it sets out the order in which employers must approach risk management:
  1. Substitution (i.e. try a risk-free or less risky option).
  2. Prevention (e.g. erect a machine guard, or add a non-slip surface to a pathway).
  3. Reorganise work to reduce exposure to a risk. A basic rule is to adapt the work to the worker. In an office, ensure chairs and display screen equipment (DSE) are adjustable to the individual, and plan all work involving a computer to include regular breaks. For monotonous or routine work, introduce work variety and greater control over work. In call centres, introduce work variety by providing work off the phones and varying the type of calls handled.
  4. As a last resort, issue personal protective equipment (PPE) to all staff at risk, and make sure they are trained in when and how to use this equipment, such as appropriate eye protection, gloves, special clothing, footwear.
  5. Provide training in safe working systems.
  6. Provide information on likely hazards and how to avoid them.
  7. Provide social and welfare facilities, such as washing facilities for the removal of contamination, or a rest room.

HOW OFTEN SHOULD A RISK ASSESSMENT TAKE PLACE?

The Health and Safety Executive (HSE) says risk should be assessed "every time there are new machines, substances and procedures, which could lead to new hazards." 
An employer should carry out a risk assessment
  • whenever a new job brings in significant new hazards. If there is high staff turnover, then the way new staff do their work should be checked against the risk assessment, and training provided in safe working practices if necessary;
  • whenever something happens to alert the employer to the presence of a hazard – for example, an unusual volume of sickness absence, complaints of stress and bullying, or unusually high staff turnover;
  • in response to particular changes to the level of risk to individual employees – for example, where an employee returns to work after a period of long-term sickness absence; or
  • Where an employee is pregnant or breastfeeding and her work might involve a risk to her or her unborn child’s health and safety. (Regulation 16, Management of Health and Safety at Work Regulations 1999).

Featured Post

Computers in Art Practice:Manfred Mohr

Artist Manfred Mohr Since 1969, Manfred Mohr has used computers and plotters as electronic and digital drawing aids, thus making inevita...