Friday, May 17, 2019

Creating shadows

julianna kunstler logo
shadows

drawing the right way

by JuliannaKunstler.com
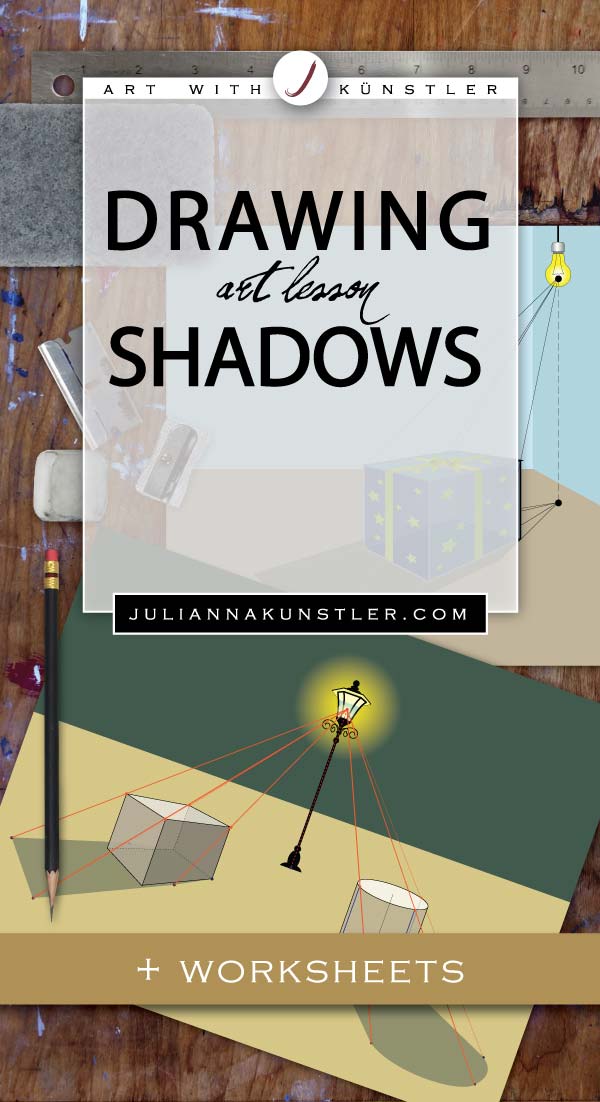
Complete tutorial to draw shadows. Both natural and artificial light sources.
Drawing shadows is an important part of a 3-D drawing. You need to understand the geometry behind this process to make your drawings most life-like. It is not as hard as it looks.
Drop shadow is a shape that is created by an object on a surface (or multiple surfaces) by blocking the light.
To see a drop shadow you need a light source.

in this tutorial:
shadow of a point
shadow of a point
shadow of a line
shadow of a line
shadow of a box
shadow of a box
shadow of a cylinder
shadow of a cone
shadow of a cone

natural light shadow

STEPS

light

There are two types of light sources: natural (sun, moon) and artificial (lamp, candle, flash-light, etc).

natural light

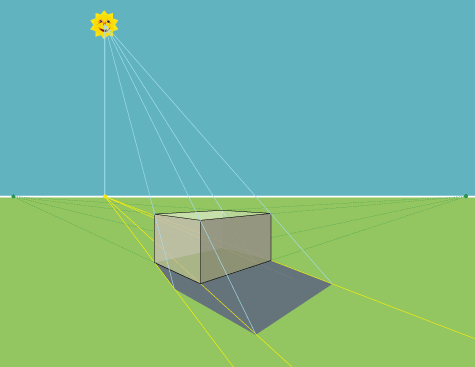
Our natural light sources ( Sun and Moon) are quite far away. Building a shadow will involve some of the linear perspective elements (horizon line).
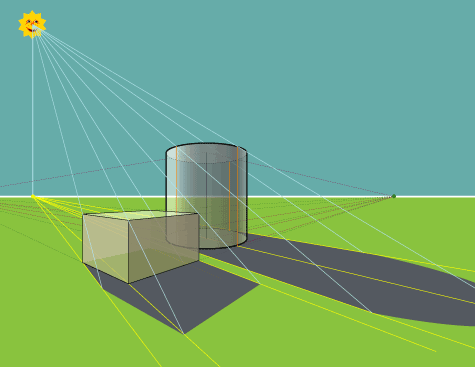
natural light shadows

artificial (spot) light

Spot light is much closer to us. We can position it more accurately in our environment - we can tell exactly how far it is from the object and how high it is from a surface.
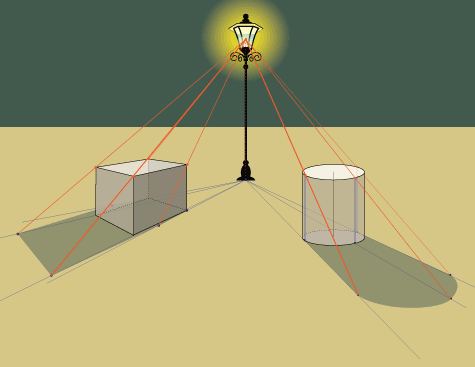
spot light shadows

you need to know:

shadow structure
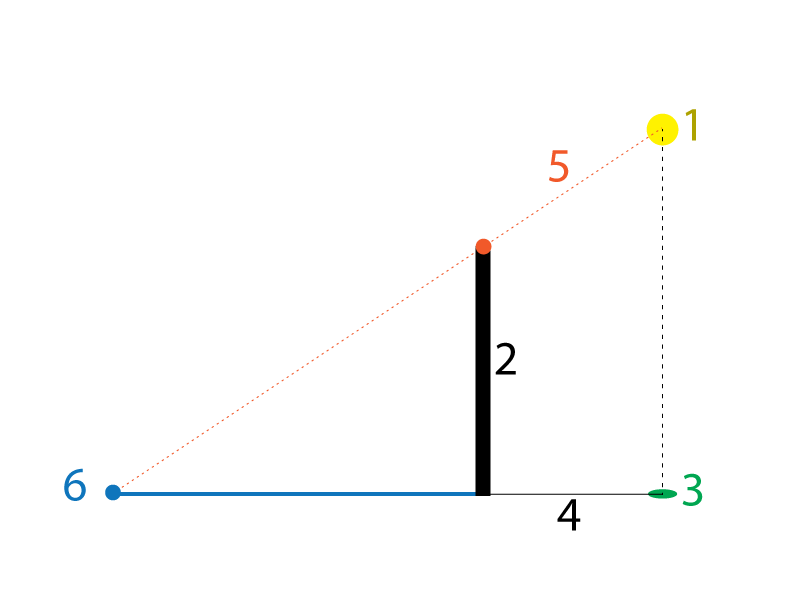
1 - Light source (yellow dot)
2 - Object
3 - Light source ground mark - position of the light source on the surface or ground (green dot)
4 - Line, connecting the position of the light source and the bottom of the object (black line)
5 - Line connecting the light source (1), the top of the object (red dot), and Line 4 - defining the end point of the drop shadow (6)
6 - The end point of the drop shadow on the surface
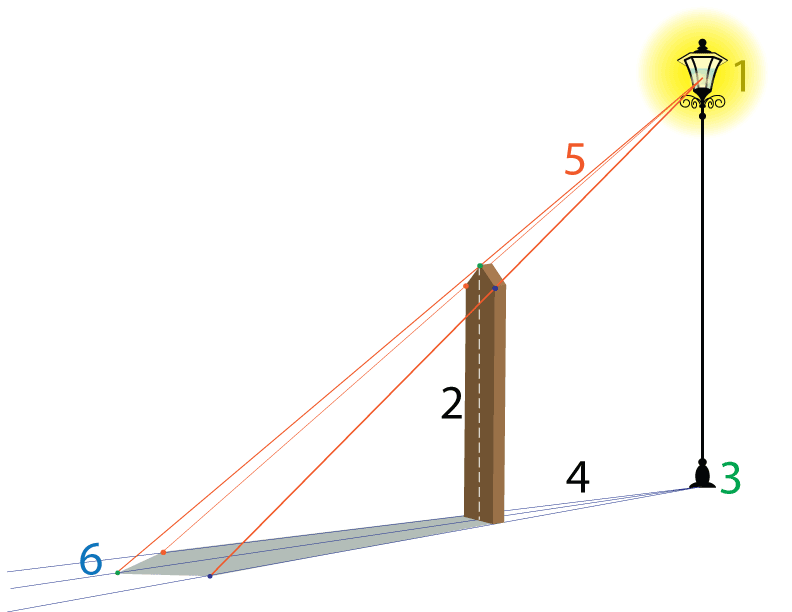
shadow structure
This rule is applied for both types of the light source and for all forms and objects.
There is only one difference:

diffused light source
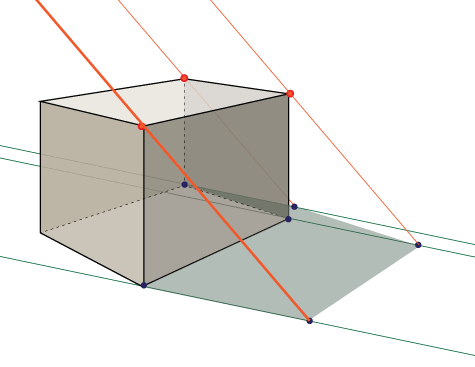
natural light shadow
The lines 4 are parallel as the light source is not defined (cloudy day, window, very large light source, etc) so we don't need to draw a yellow dot (1).
Lines 5 are also parallel for exactly the same reason.

spot light
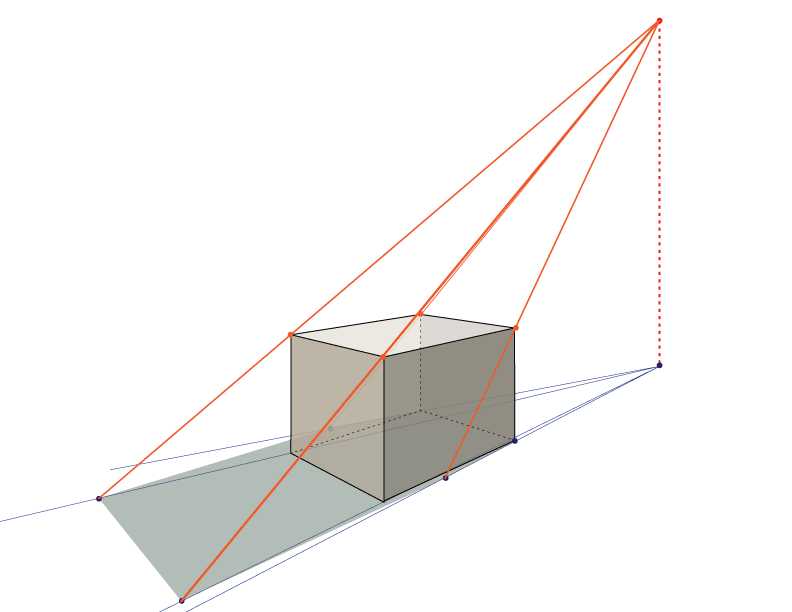
spot light shadow
Each corner point follows the above rule to form an exact shape of the drop shadow.

spot light

shadow of a point
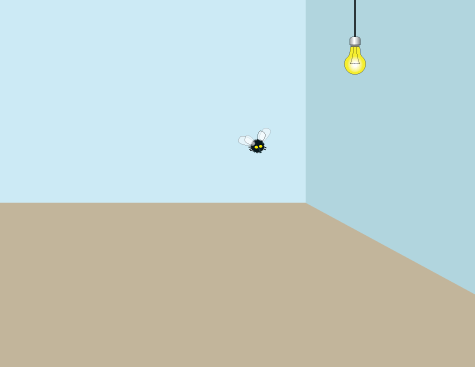
shadow of a point
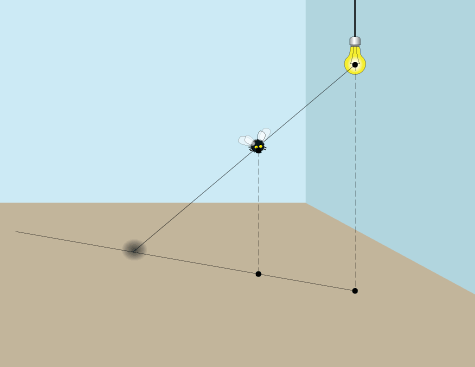
Imagine that you need to draw a drop shadow of a very small round object, almost a dot. Let's draw one of a fly. Why not?
So here we have a room with one spot light and a fly. The ground surface is the brown floor - this is where we are going to place the shadow.
shadow of a point
The first thing you do is mark the position of the light source on the floor (light ground mark).
You do it by drawing a straight vertical line down to the floor and marking the point on the floor that is exactly below the light.
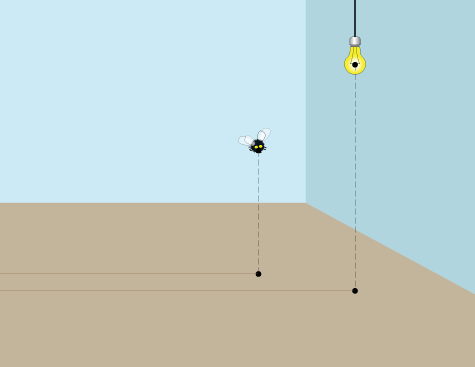
shadow of a point
Now you need to mark the position of the fly on the floor (object ground mark).
Please note the position of the light and the fly in respect to each other - in my case, the light is closer to me than the fly (you don't need to draw the brown horizontal lines - they are just for a reference).
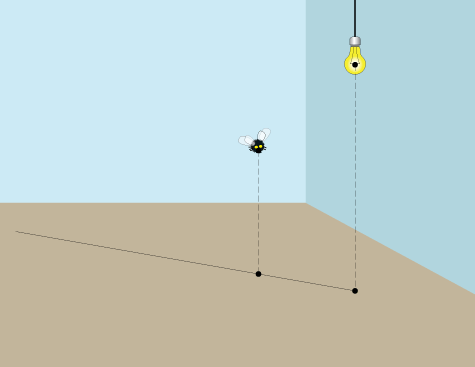
shadow of a point
Now connect the light ground mark and the object ground mark on the floor with a line - it will define the direction of where the shadow will appear on the floor.
shadow of a point
Great!
One more construction line, and you're done!
Draw a line from the light through the fly - all the way to the ground.
The intersection will mark the position of the drop shadow!
Please note:
If you have a reference point for the light source in your drawing - then you do not need to guess or estimate your ground light mark.
For example: the light source is attached to a ceiling or a wall.
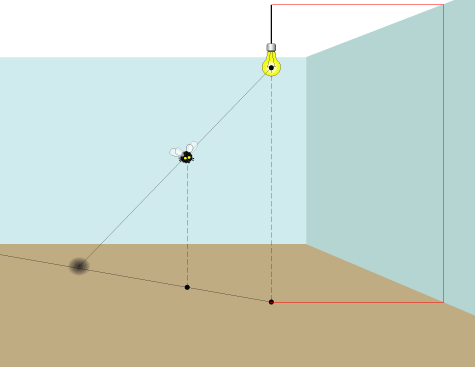
shadow of a point

shadow of a line

flat shadow

shadow of a line
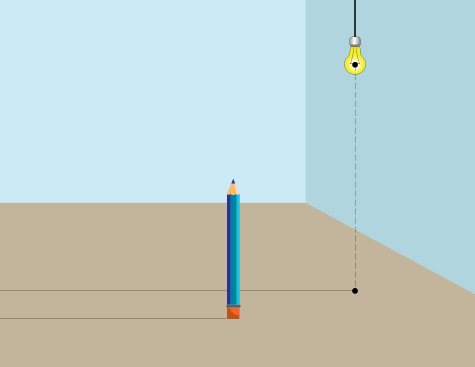
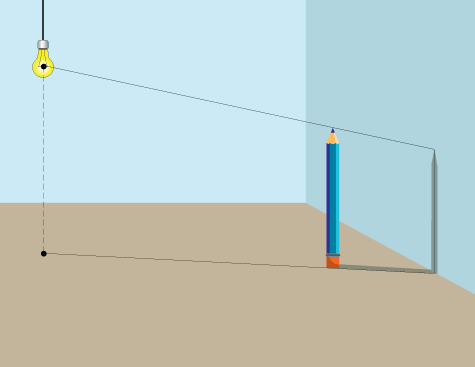
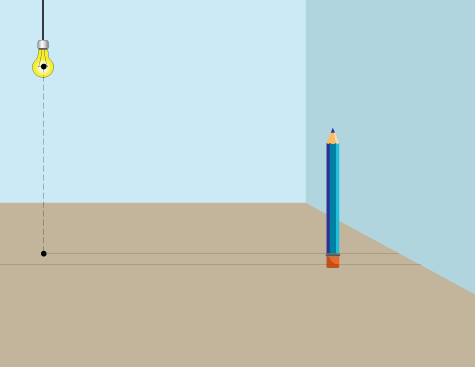
Drawing a shadow of a line is, actually, a bit easier - you don't need to define the position of the object on the floor!
So, start, again, with defining the position of your light on the ground surface (floor) - place the light ground mark. Please note, that in this case my object (pencil) is closer to me that the light.
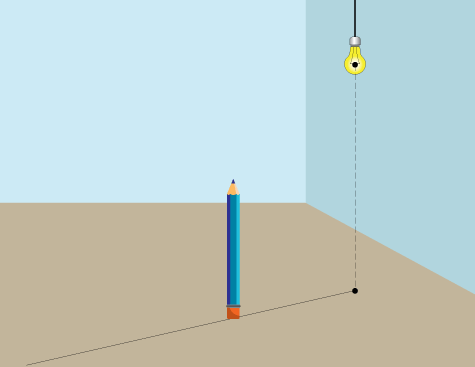
shadow of a line
Connect the light ground mark with the bottom of the line (pencil, in this case).
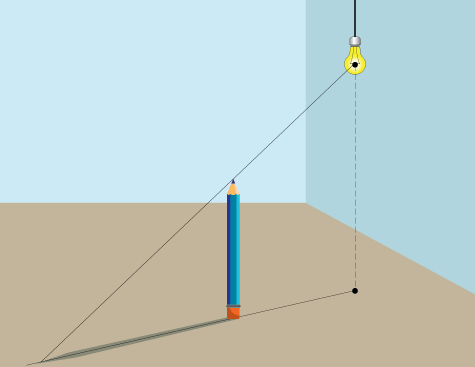
shadow of a line
Now draw a line (light ray) from the light through the tip of the line (pencil).
That will define the length of your drop shadow.

bent shadow
bent shadow of a line
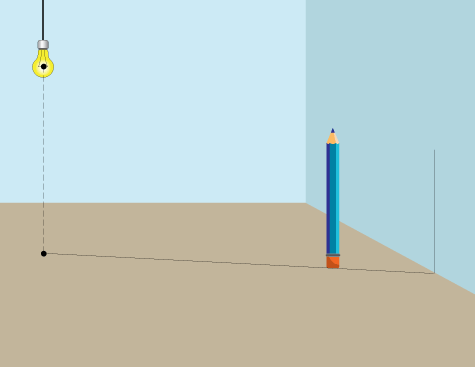
In case you need to draw a shadow that falls on multiple surfaces (floor and walls) - use the same steps, just tweak them a little.
Let's say your line (another pencil) is close to the wall. The drop shadow will fall on both the floor and the wall. This is how you do it:
bent shadow of a line
Just bend the line when it hits the wall!
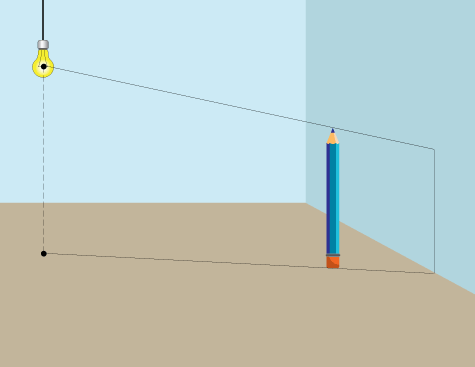
bent shadow of a line
Draw a line from the light through the top of the line (pencil) as shown:
shadow of a line
That's it!

shadow of a box

box shadow
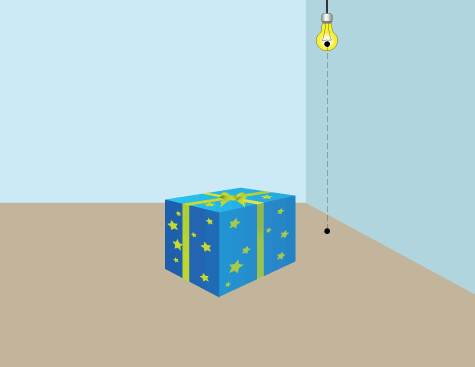
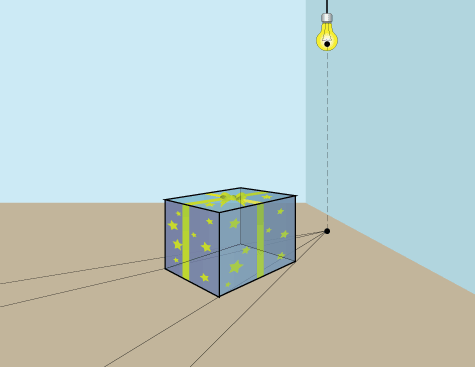
Drawing a drop shadow of a cube (box) is a repeated use of the same technique as we did with drawing s shadow of a line.
You will have to repeat the steps with all corners that form a shadow.
box shadow
As you already know, the best way to draw 3-D forms is to draw them with "see-through sides" - as if the form is made of glass.
Connect the light ground mark with all bottom corners:
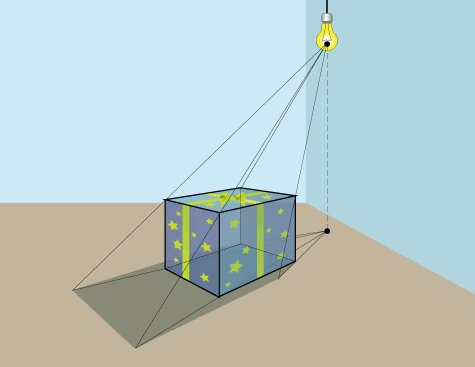
shadow of a box
Draw lines from the light through the top corners of the box.
The intersections are the points that form a shadow shape. All you have to do now is to connect the dots!

shadow of a cylinder
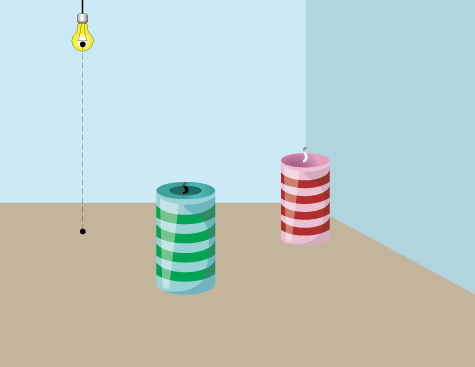
shadow cylinder
The same technique is used to draw a shadow of a cylinder, with a few minor adjustments.
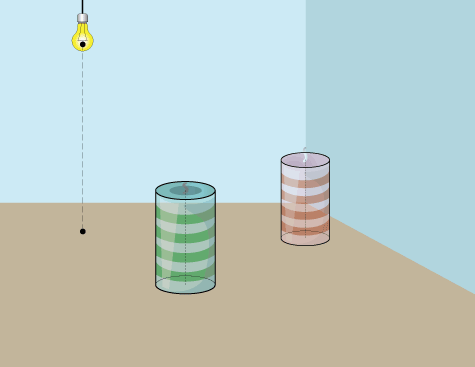
cylinder shadow
Keep all construction lines (axis of symmetry, ovals):
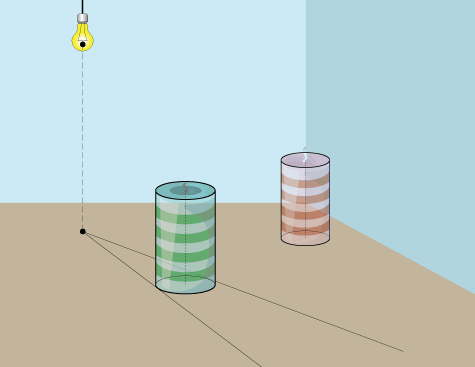
cylinder shadow
Draw lines from the light ground mark through the widest parts of the bottom oval:
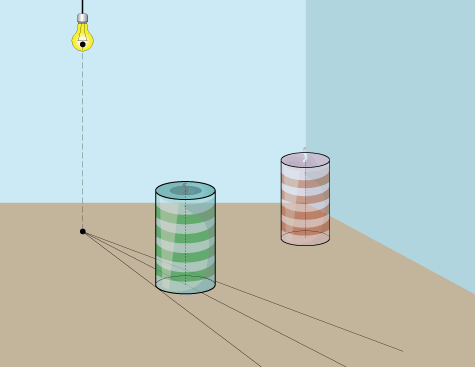
cylinder shadow
Also, draw a line through the bottom of the axis of symmetry.
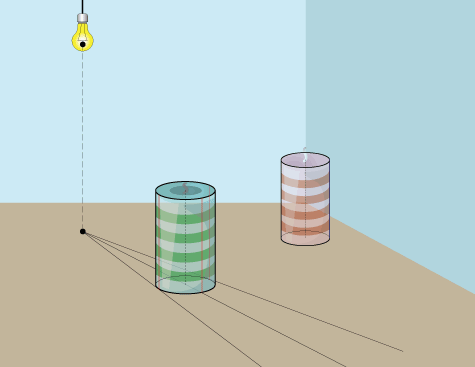
shadow of a cylinder
Draw vertical lines from the bottom ovals to the top ovals as shown.
cylinder shadows
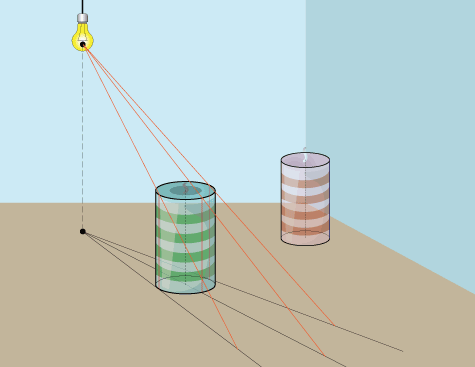
Draw lines from the light through the top oval's dimension points like this:
shadow
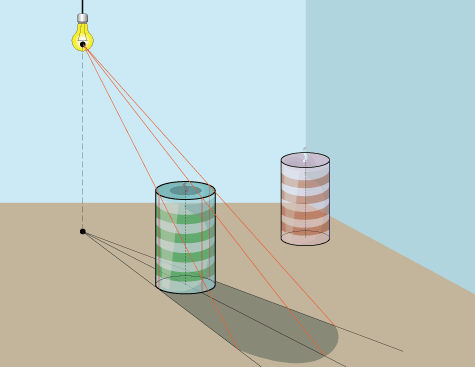
Time to trace the shadow. The two sides are straight lines that follow the ground lines. The middle (axis) projection is the furthest point of the shadow. Connect the three dots with a curve.
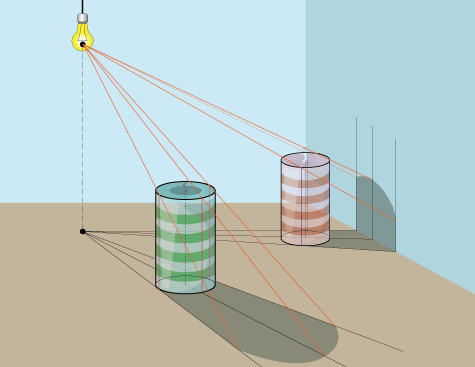
shadow of a cylinder
Drawing a shadow of a cylinder on multiple surfaces is like drawing a shadow of a line on multiple surfaces:

shadow of a cone
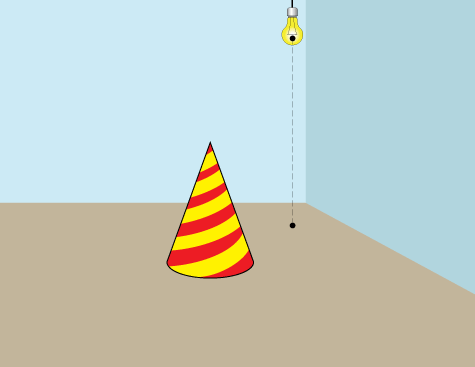
cone
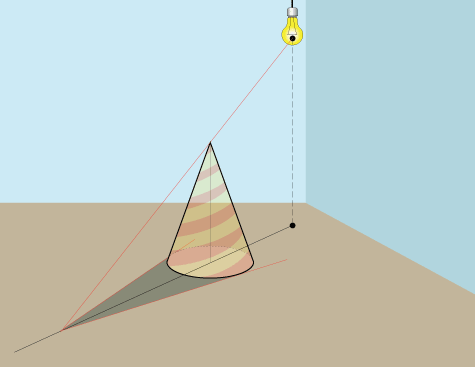
Start with placing a cone on the floor.
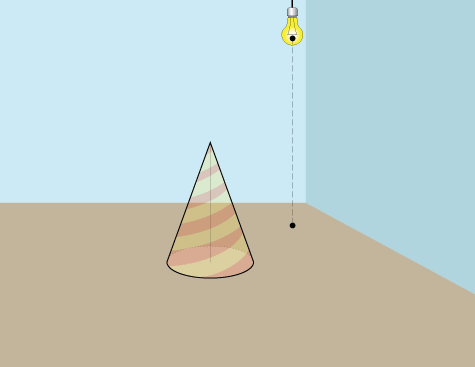
shadow cone
Have all construction lines in place (axis of symmetry, bottom oval)
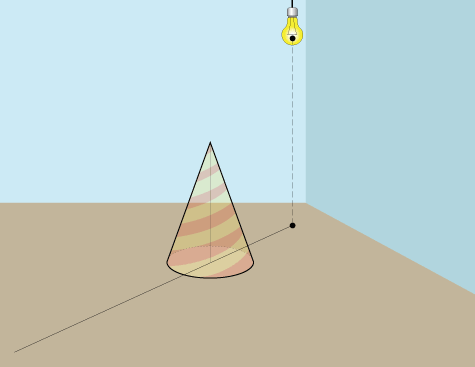
cone shadow
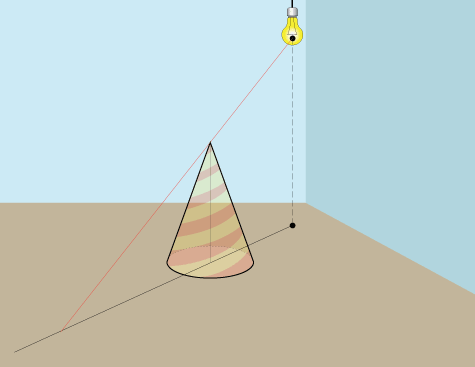
Draw a line from the light ground mark and the bottom of the axis of symmetry
cone shadow
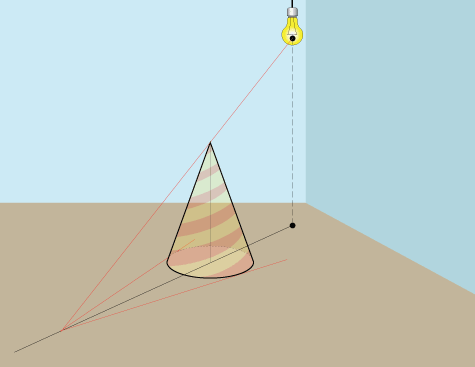
Draw a line from the light through the top of the cone to the ground line.
shadows cone
Draw lines from he point of the top's shadow through the widest parts of the oval
shadow of a cone
The shadow is done!

natural light

shadow in perspective
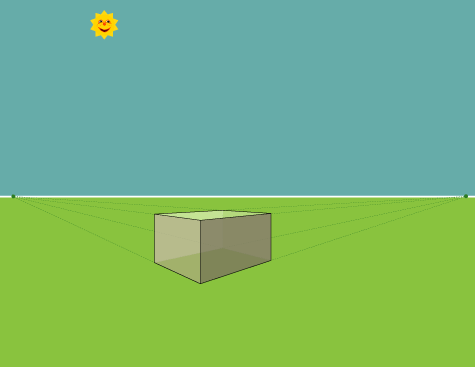
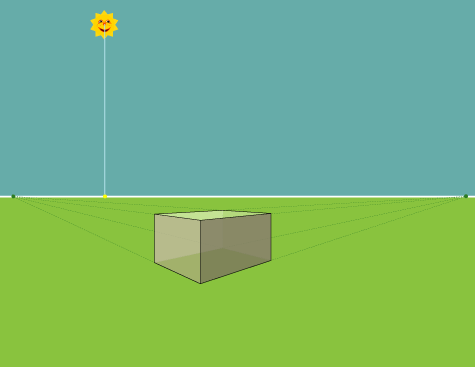
Place an object on a ground.
Define HORIZON line.
shadow in perspective
Because the Sun is so far away - we mark its position reference point on the horizon line.
Just draw a straight line down.
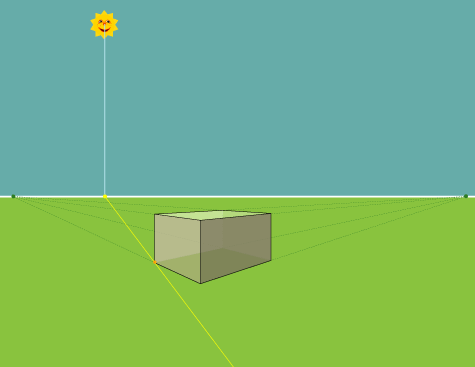
From the Sun reference point draw a line through a bottom corner of the box.
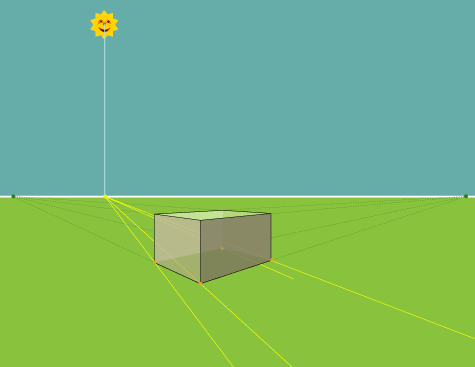
natural light cast shadow
Then draw lines through each bottom corner.
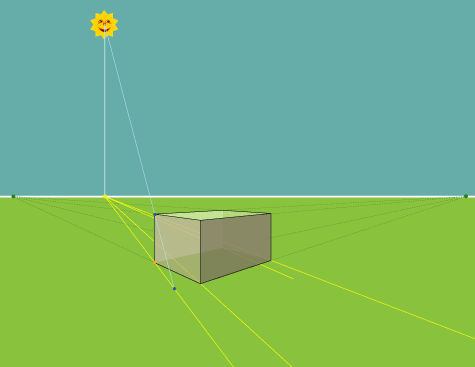
natural light cast shadow
From the light source - draw a line through the top corner of the box until it reaches the ground line.
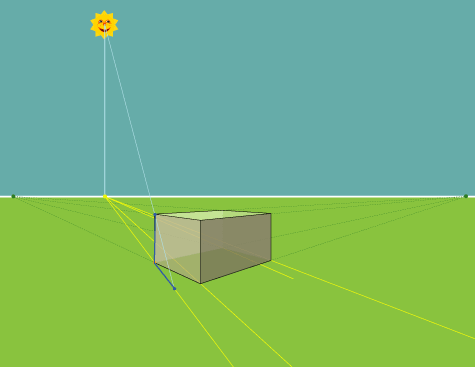
natural light cast shadow
That will start defining the area that is blocked from the light source.
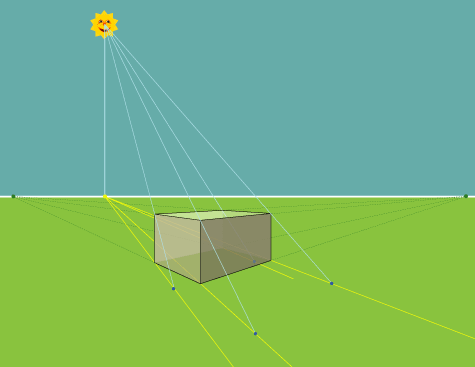
natural light cast shadow
Draw the rest of the lines from the light source.
Mark the crossing points.
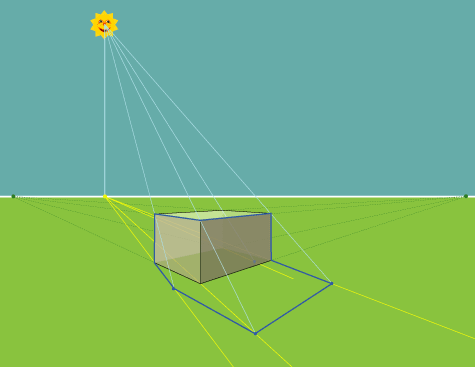
natural light cast shadow
Connecting all points will create a shadow outline.
natural light cast shadow
Shade the shadow.
It is usually getting lighter as it gets further away from the object.
...

Friday, April 12, 2019

Using a dream portfolio to develop as an artist

https://create.adobe.com/2019/2/27/using_a_dream_portfo.html


During my year as an Adobe Creative Resident, I’ve gone through an extremely intensive learning process that has shaped me into a completely different artist than I was when I began as a Resident, in May 2018. It would have otherwise taken years for me to get to this point in my artistic development, but a few key factors fast-tracked my progression—one of them being a dream portfolio!
I was taught this lesson by Lee White—you can find more fantastic information and demos about how to become a better artist from him, Will Terry, Jake Parker, and other amazing artists at the Society of Visual Storytelling. Lee was a teacher of mine in college, and the amount of artistic and business knowledge that he shared with me and other students made all that college debt worth it.
The image on the left is an older illustration that Daviscourt created; the image on the right reflects how her illustration style has progressed, as she moves toward her goal of becoming an illustrator of children’s books. 
Daviscourt says, “I recently revisited an old piece to really hammer home the new style that I had developed with my latest dream portfolio. I love seeing the clear progression and knowing that each new piece is better than the last!”
I made my first dream portfolio in art school, and again about seven years later when I got kicked into gear. I realized that mindlessly making pretty stuff would never get me the fulfilling career that I dreamed of—I had to be present in my progression as an artist.
So what is a dream portfolio? It’s a selection of your all-time favorite pieces of art, which you study in order to develop your skills in a specific direction.
STEP 1: FIND WHAT YOU LOVE
If you aren’t gathering reference on the regular yet, start now! My favorite sites for this are Behanceand Pinterest. Social media can be a great source as well—just make sure to save images that catch your attention along with the artists’ names. Creating this treasure trove of imagery will give you a quality pile to comb through when you’re looking for your favorite art.
Daviscourt finds reference and inspiration on Behance, as well as on Pinterest and other social media platforms. 
This year, I switched from doing concept art to the world of children’s publishing, so it was essential that I find children’s book art to pull from. It wasn’t that I was creating bad artwork; it’s just that the work I was creating wasn’t serving my career growth.
Looking at my older work now, I feel that it lacked purpose and wasn’t very consistent. But above all, it didn’t fit into the world of children’s publishing like my newer work does. I bet in another five years I’ll have a totally different style, but I know it’ll be what I love!
Daviscourt says that her newer work—such as this illustration—is more in line with what she wants to be creating. See more of what she is working on, on her Behance page.
Once you’ve picked out around 10 to 15 images that you can deem your favorites, you’re ready to move to the next step:
STEP 2: FIGURE OUT WHY YOU LOVE IT
Now it’s time to dissect your favorite work. I would recommend stepping back to take in all of the pieces at once. What do the images in your collection have in common? Are the colors, mark making, shape design, and/or storytelling techniques similar? Is there something that catches your eye first in each piece? Write everything down.
These illustrations by Taylor PriceDung Ho, and Disha Orsha are among the favorites in Daviscourt’s dream portfolio. 
Next, go one by one through the images and write down your favorite aspects of each one. Make sure to take breaks and come back to see your collection with fresh eyes. Write everything down, and hopefully you’ll notice some patterns and make new discoveries about what you love most.
Daviscourt added this image, by Jacob Grant, to her dream portfolio because she admires its shape design, color palette, texture, lighting, and magical tone. 
STEP 3: STUDY THE SKILLS
Once you’ve identified your favorite aspects of the artwork, it’s time to do some studies of the pieces. This can greatly widen your understanding of what you’re capable of while also guiding you closer to the style that you want in your work.
There are two ways of going about studying your dream portfolio:
The first is a master study. This is a replication of the original artwork, starting from scratch and using nothing but your eyes. No color picking, no overlaying—challenge yourself to get it exact!
The second is a technique study. Take an element of how the artist creates their work and replicate it. If the element is design based, sketch it out. If it’s technique based, paint a swatch. Just figure out how the artist might go about making that art, and then do that.
If you’re ever stuck because you don’t know the medium/technique they use, look at more pieces in their portfolio or just ask them!
Daviscourt does style studies of artists she admires, such as illustrator Emily Hughes. 
STEP 4: LEVEL UP
Now it’s time to put this knowledge to use! Design a new piece while keeping your dream portfolio handy. I guarantee that if you follow this method without skipping the tough bits, you will begin to see a change in your work. You might even want to choose an older piece and re-create it. 
STEP 5: KEEP IT UP
You should refresh your dream portfolio regularly, just like your personal portfolio. Make sure to reassess what you truly love about what you do and where you want to fit within the design world. It may sound really simple, but stepping back and reframing what you’re spending your life doing is extremely beneficial.
There are infinite ways to customize this process, so trust your instincts and keep moving forward!

Featured Post

Computers in Art Practice:Manfred Mohr

Artist Manfred Mohr Since 1969, Manfred Mohr has used computers and plotters as electronic and digital drawing aids, thus making inevita...