Monday, October 29, 2018
How To Create Geometric Stripy Line Art in Illustrator
Adobe Illustrator is the perfect tool for creating abstract art with basic shapes and lines. In today’s tutorial I’ll show you how to create this geometric stripy line effect with a custom Art Brush. It’s an effect that looks fantastic yet it’s pretty easy to make, plus it’s a technique that can also be used to create cool logos and typography.
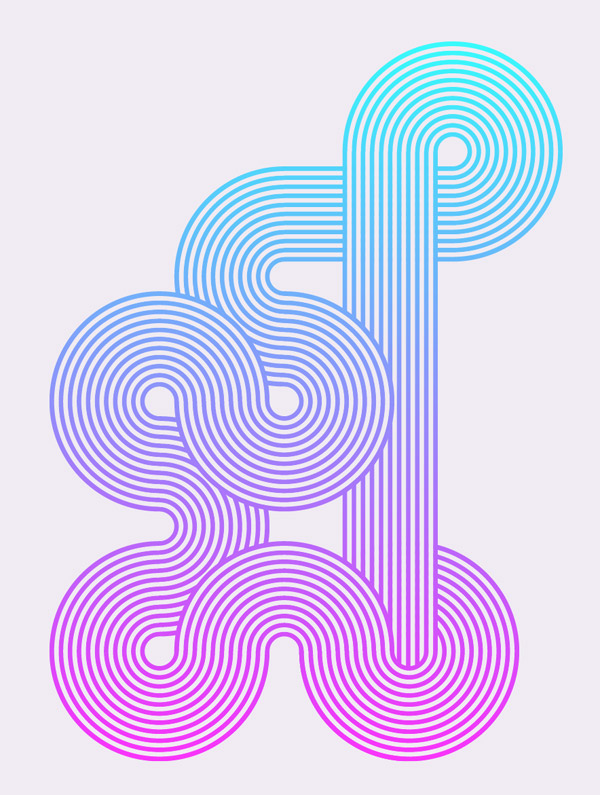
The artwork we’ll be creating is this interwoven stripy line effect. It’s a really simple process but it can be used to create some really cool designs. We’ll be using it to create a bright and colourful poster, but it also looks great when used to create intricate logo symbols or custom typography.
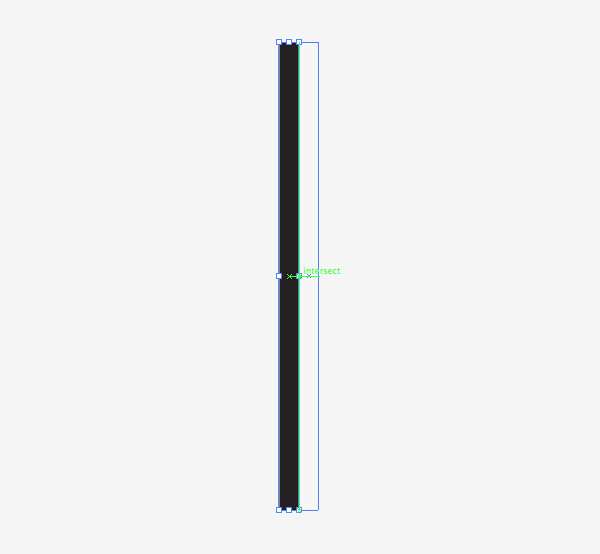
Create a new document and use the rectangle tool to draw a long thin shape with a black fill. Turn on Smart Guides (CMD+U) then hold ALT and Shift while dragging with the mouse to create a duplicate. The Smart Guides will make it easy to perfectly align these shapes side by side.
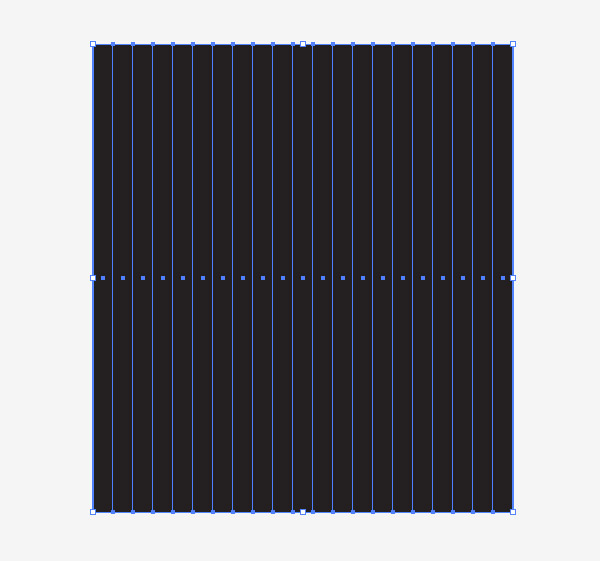
Repeatedly press the shortcut CMD+D to “Transform Again”, which repeats the duplication and creates a series of perfectly aligned shapes.
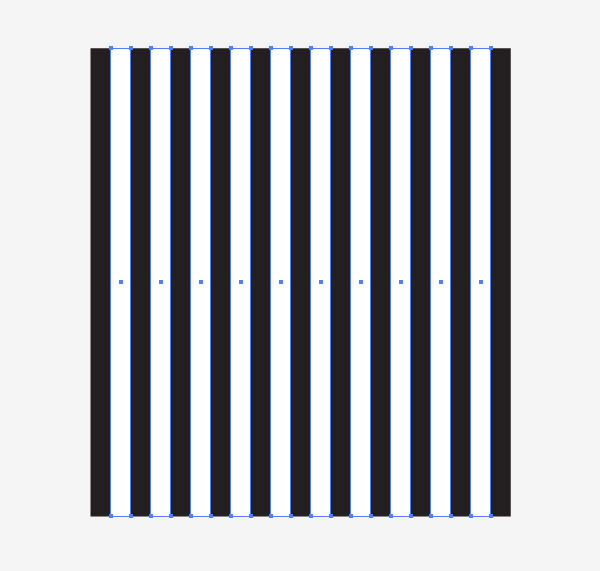
Select every alternate rectangle shape and change the fill colour to white to create a stripe pattern.
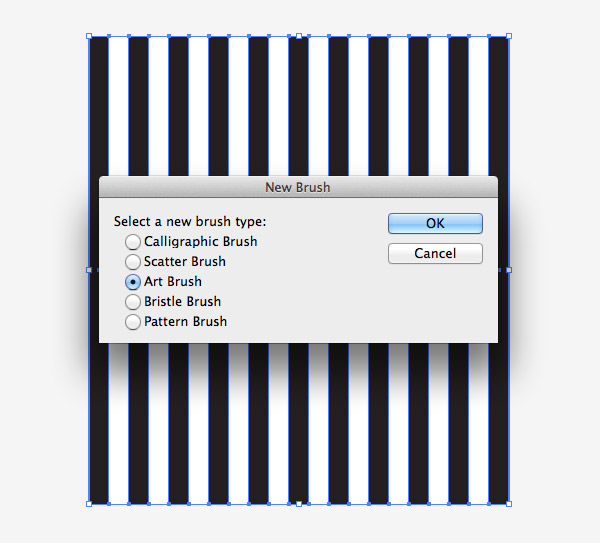
Click the “New” icon at the bottom of the Brushes panel to create a new brush. Select the Art Brush option. Ensure the flow of the brush runs vertically in the settings, then click OK.
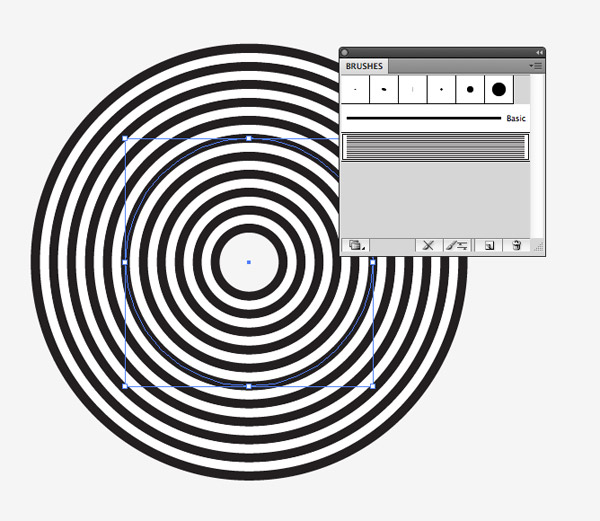
Draw a circle somewhere on the artboard. Clear the fill and stroke settings then apply the new stripy brush. Pro Tip: Turn off “Scale Strokes and Effects” in Illustrator’s Preferences to allow shapes to be transformed without affecting the brush pattern.
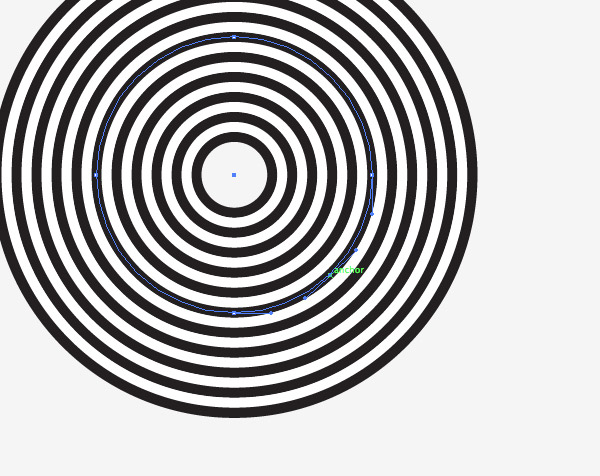
Use the Pen tool to add an anchor point between two existing points then press the delete key to create a 3/4 circle.
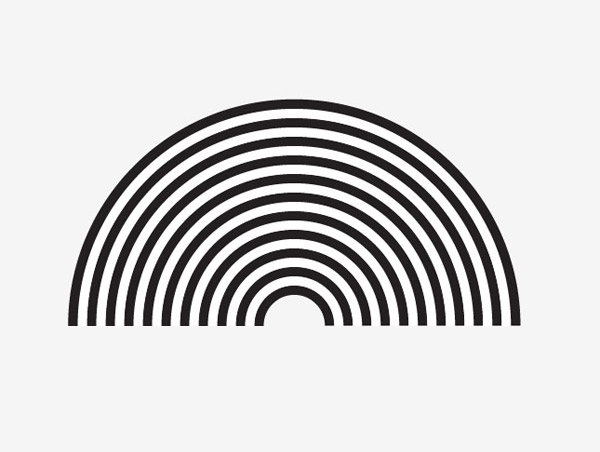
Duplicate this 3/4 circle shape then use the Direct Selection tool to delete the lowermost point to create a 1/2 circle.

Create a duplicate of the 1/2 circle then delete another point to create a 1/4 circle shape. Also apply the brush effect to a horizontal and a vertical line to round off a collection of building blocks.
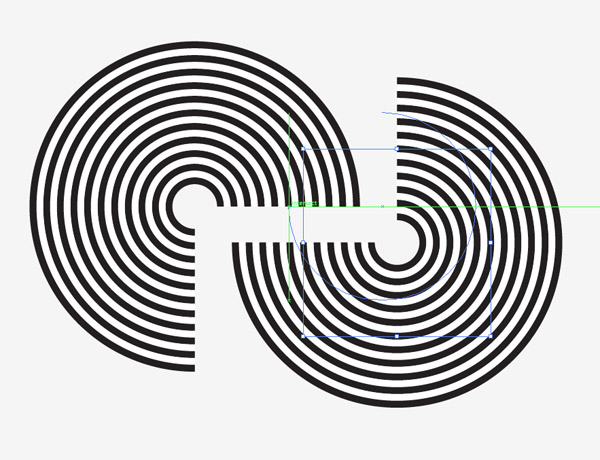
We can now begin building our designs by copying and pasting the various ready made shapes. The Smart Guides will make it easy to snap them together to perfectly align the stripy lines.
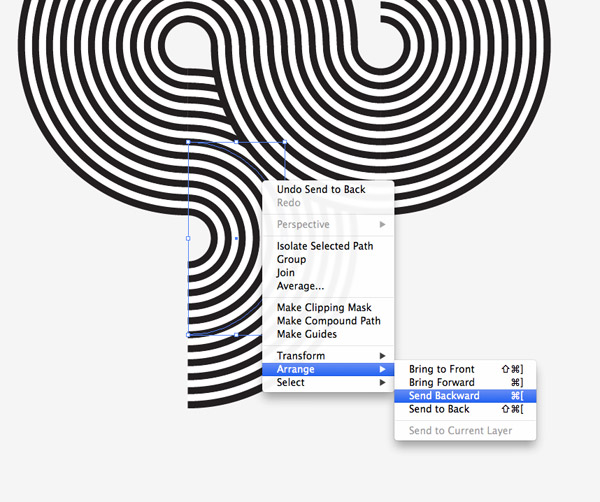
In places where the shapes overlap, you have the option of adjusting the stacking order. Use the shortcuts CMD+[ and CMD+] to shift the elements above and below each other.
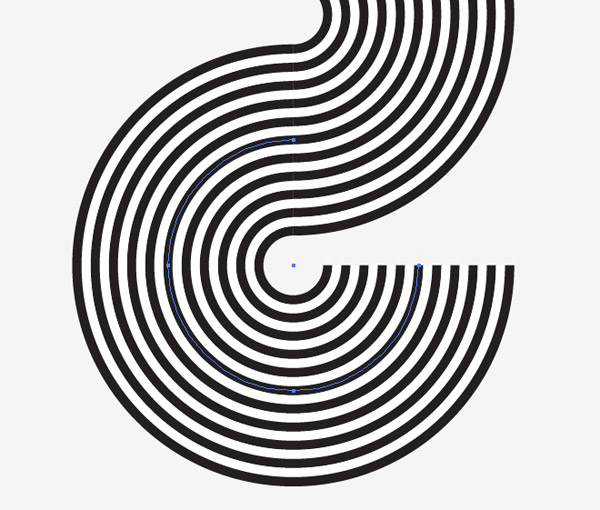
When the shapes are aligned perfectly the stripes will flow seamlessly from one shape to the next.
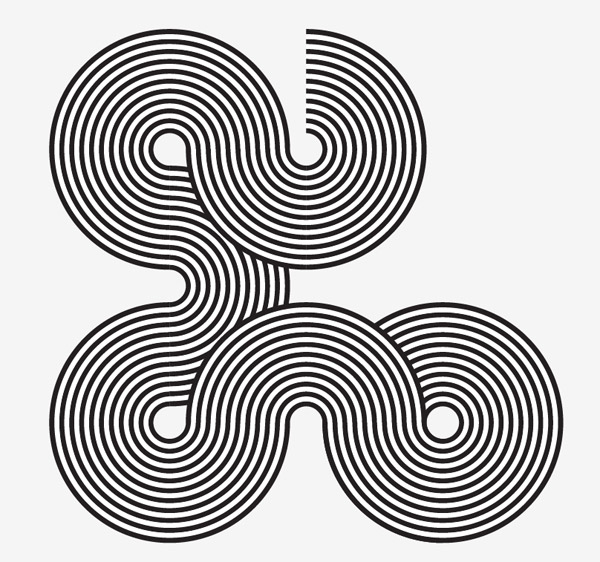
Continue to extend the illustration by adding extra elements. Remember you can rotate the shapes to alter the direction of the lines.
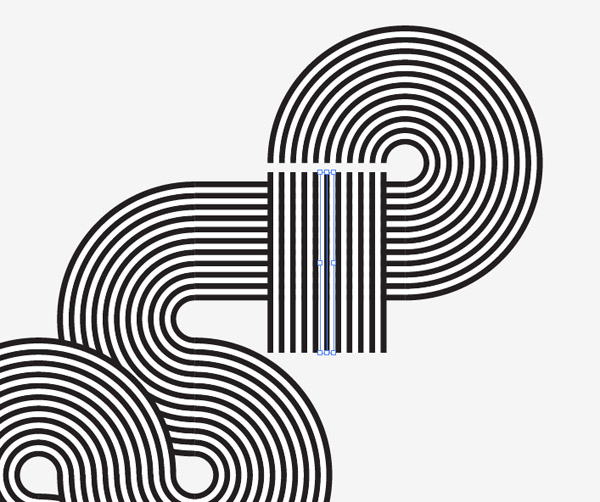
Use the straight paths to extend the illustration horizontally or vertically. These shapes can be stretched to any size.
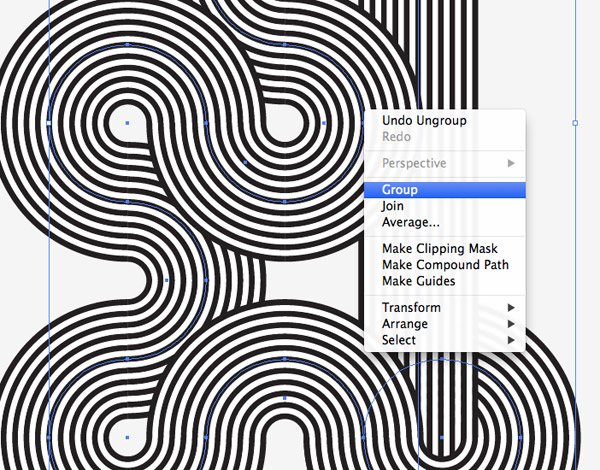
Once your illustration is complete, select all the individual paths and combine them into one group. Press CMD+C to make a copy of the artwork.
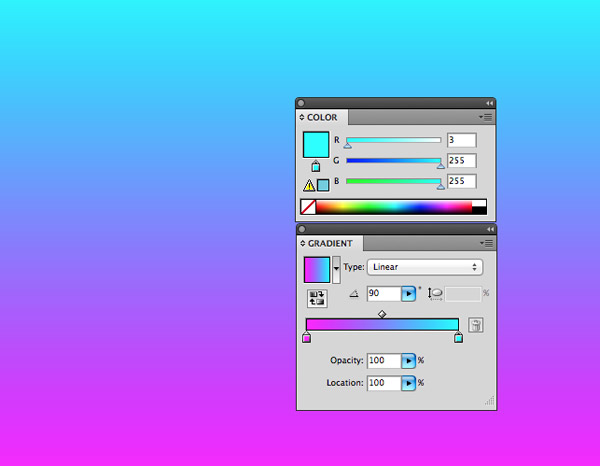
Elsewhere on the artboard draw a large rectangle and add a gradient fill. Select two bright colours that will produce a vibrant gradient.
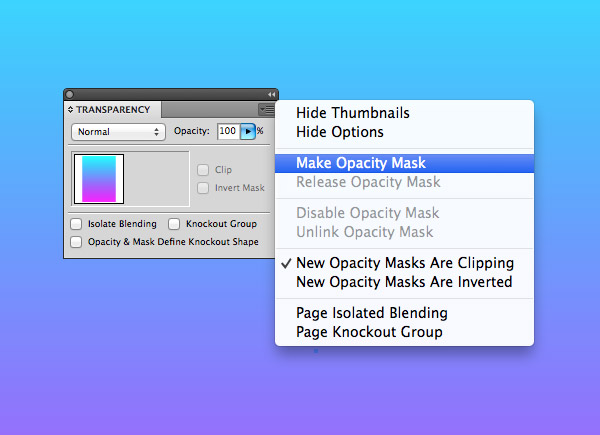
Seelct the gradient rectangle and choose the Make Opacity Mask option from the Transparency panel’s fly out menu.
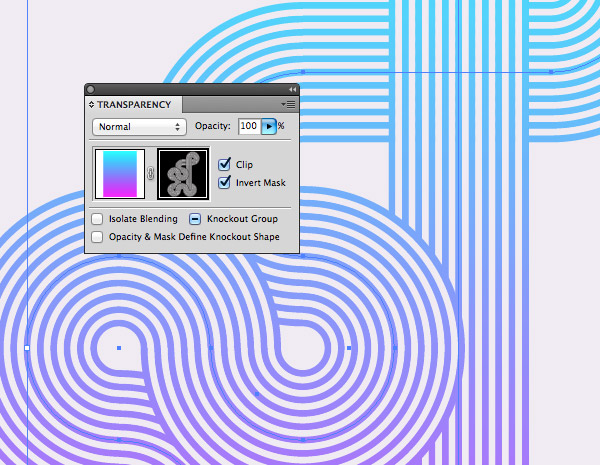
Use the shotcut CMD+V to paste in the stripy lines artwork into the opacity mask. The black and white colours will show and hide areas of the gradient fill to clip the colour to the shape of the illustration. Click the square on the left in the Transparency panel to exit out of the mask editing mode.
The final geometric stripy line artwork looks great with a vibrant gradient applied, but the technique can also be used to build some fantastic looking typography or logos. When building the initial brush, try changing the colour of each shape to create a multicoloured stripe effect!
Friday, October 26, 2018
Friday, October 19, 2018
Photoshop actions
https://www.vandelaydesign.com/photoshop-actions/
https://create.adobe.com/content/microsites/inspire/en/2018/8/10/modern_artist_photos.html
https://www.brusheezy.com/actions/58122-misty-blue-photoshop-action
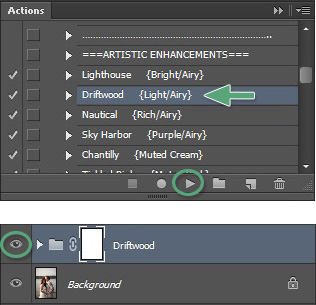 To correctly run and use Photoshop actions, first make sure your Actions palette is open and visible. If it is not visible, the go to “Window” and click on “Actions” from the dropdown menu. With the Actions palette open and Greater Than Gatsby actions already loaded, follow these easy steps.
Once the action is complete, you can click the visibility “eyeball” next to the newly created layer and see the effect with and without the action being applied.
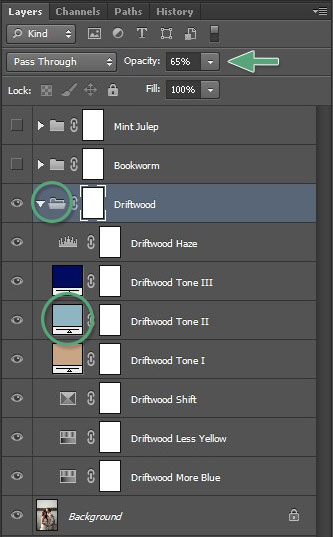 All images are different and in most cases the default settings for an action will need to be tweaked to achieve the perfect look for your photo. There are two main ways to modify or customize a Photoshop action once it has been applied.


https://create.adobe.com/content/microsites/inspire/en/2018/8/10/modern_artist_photos.html
https://www.brusheezy.com/actions/58122-misty-blue-photoshop-action
HOW TO INSTALL PHOTOSHOP ACTIONS & BRUSHES IN PHOTOSHOP

There is more than one way to install Photoshop actions into Photoshop.
The Easiest Method:
- Simply double-click the .atn file.
- Note: When you restart your computer actions installed this way tend to disappear.
The Best Method (to get your actions to stick):
- Save your actions in an easy to find location on your computer.
- Open Photoshop and go to the actions palette.
- If the actions palette is not visible, go to “Window”, then click “Actions” in the dropdown.
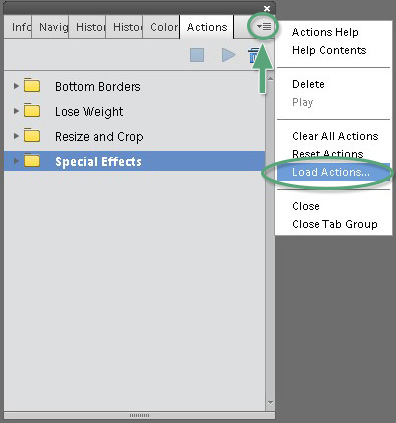
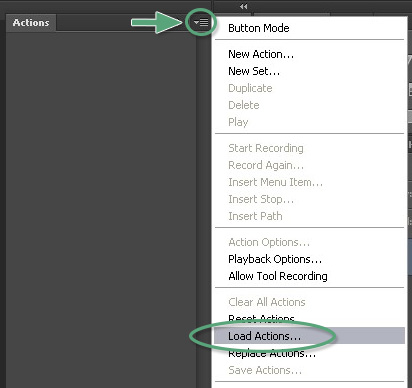
- In the top right corner of the actions palette, click on the small box containing an upside down triangle and 4 horizontal lines.
- From the drop down menu, select “Load Actions”.
- Navigate back to where you saved the actions and select the file ending in .atn.
- Click “Open” and your actions will load into the actions palette.
HOW TO USE PHOTOSHOP ACTIONS IN PHOTOSHOP
 To correctly run and use Photoshop actions, first make sure your Actions palette is open and visible. If it is not visible, the go to “Window” and click on “Actions” from the dropdown menu. With the Actions palette open and Greater Than Gatsby actions already loaded, follow these easy steps.
- Click the action you would like to run.
- Navigate to the Bottom of the Actions palette.
- Find the button shaped like a triangle lying on its side.
- Click the “Play” button and wait for the action to complete.
Once the action is complete, you can click the visibility “eyeball” next to the newly created layer and see the effect with and without the action being applied.
As an added bonus, Greater Than Gatsby actions include easy-to-follow explanations and guides built within each action, which become visible in the form of a pop-up message box when an action is run.
HOW TO MODIFY THE EFFECT OF A PHOTOSHOP ACTION IN PHOTOSHOP
 All images are different and in most cases the default settings for an action will need to be tweaked to achieve the perfect look for your photo. There are two main ways to modify or customize a Photoshop action once it has been applied.
The most common method for adjusting the effect of a Photoshop action is to adjust the opacity of the entire layer group. You can select a layer group by clicking the “folder” icon next to an already run action within the layer palette. Once the layer group is selected, you can adjust the opacity by adjusting the intensity of the effect up or down.
The more detailed method for adjusting the effect of an action is to adjust the individual layers within the layer group. This requires a deeper understanding of the different components within the layer group, but the method for adjusting the opacity remains the same. Simply select the individual layer from within the group and adjust the opacity as needed.
Note: Actions will always work better on RAW images, simply because there is more information and data to manipulate. When actions are applied to a JPEG image, the effect can sometimes be overpowering. When this happens, you can simply reduce the opacity of an action’s layer to calm the effect.
HOW TO INSTALL PHOTOSHOP ACTIONS IN PHOTOSHOP ELEMENTS
The Easiest Method:
- Simply double-click the .atn file.
- Note: When you restart your computer actions installed this way tend to disappear.
The Best Method (to get your actions to stick):
- Save your actions in an easy to find location on your computer.
- Open Photoshop Elements and make sure you are in Expert mode.
- Go to the actions palette.
- If the actions palette is not visible, go to “Window”, then click “Actions” in the dropdown.
- In the top right corner of the actions palette, click on the small box containing an upside down triangle and 4 horizontal lines.
- From the drop down menu, select “Load Actions”.
- Navigate back to where you saved the actions and select the file ending in .atn.
- Click “Open” and your actions will load into the actions palette.
When the actions are loaded into the actions palette they will remain unless you delete the original folder where you saved the actions.
VIDEO: HOW TO INSTALL ACTIONS INTO PHOTOSHOP ELEMENTS 11-15
FREE PHOTOSHOP ACTIONS: BLACKNULL’S MODERN ARTIST ACTION SET
By Charles Purdy
We’re sharing an action set for Adobe Photoshop CC that you can download—for free—and use to turn photographs into vibrantly colorful works of modern art. Photoshop artist Nuwan Panditha, also known as BlackNull, created this action set just for Adobe Create readers.
BlackNull used his action set on these Adobe Stock photos to create dazzling works of art.
This action is easy to use but almost infinitely customizable. Even if you’re not a “read the instructions” person, reading these instructions (and watching the three brief how-to videos) will serve you well in this case!
BlackNull tested the action on the latest Adobe Photoshop CC, but it’s compatible with Photoshop versions CC 2015 and higher. The action relies on the Oil Paint filter, which relies on your graphics processor (go to Preferences > Perfomance and make sure that the Use Graphics Processor option is selected).
INSTALLING THE ACTION AND PREPARING THE IMAGE

Watch this video for instructions on installing the action and preparing your image file. The instructions are written out below.
1. First, download the action file and then unzip it. You’ll see that it is an .atn file. Then open Adobe Photoshop, open the Actions panel (Window > Actions), select Load Actions, and choose the file you just downloaded.
2. This will add two Modern Artist actions to your Actions panel. The first action is the standard one; the second is for very high-resolution images (5,000 pixels or larger).
3. Open an image to work with in Photoshop. The action works well on images with a clear subject area that you can isolate (such as a portrait), but feel free to experiment!
4. Make sure your image is in RGB 8-bit color mode (go to Image > Mode to check this).
5. Make sure your image is large enough. The action was tested on images between 1,000 and 6,000 pixels; for best results, you should make sure that your image is within that range. (Go to Image > Size, and make sure that the higher of the two parameters—width or height—is within this range; otherwise, adjust the value.)
6. Make sure that the image layer is locked and set as the background layer (Layers > New > Background from Layer). Note that if your version of Photoshop uses a language other than English, you may need to change the name of this layer. (For instance, this layer is called arrière-plan in French. Double-click on the name to rename it background.)
APPLYING THE ACTION

Watch this video for instructions on running the action. The instructions are written out below.
1. At this point, your Photoshop file should have only one layer—the background layer.
2. Create a new layer, and name it mask. Note that you must use the word mask, in all lowercase letters, as this layer’s name.
3. Using a hard-edged brush, on the mask layer, paint over the area that you want to isolate as your subject. You can use any method for this (the Lasso or Magic Wand tool will also work, for instance). The important thing is to make a well-defined painted “mask” of your subject area.
4. Open the Actions panel, select the Modern Artist action that is correct for your image size, and click on the play icon. The run time will depend on your machine and on the image’s resolution, but the typical run time is two minutes or less. (If you’ve recently installed or updated Photoshop, you may receive a message that says, “Smart filters stacked on top of this filter will not preview while this filter is being edited.” You can safely select “Don’t show again” to remove this message.)
5. When the action has finished running, you’ll get a “Render Completed” notification. Click on Continue.
6. There will be many opened groups and layer styles in the Layers panel, and it will look very messy. Don’t panic! To organize everything, hold down the option key (or alt key on a Windows machine) and click on the arrow of the layer group called Modern Artist - OUTPUT; this will close the group. Then release the option or alt key, and when you open the group again, the layers will be organized in color-coded folders.
And if you like the image you’ve created, you could stop here. But there’s a lot to explore and nearly infinite ways to customize what you’ve created.


You may like what you see when the action is finished running, but there is a nearly infinite number of ways to alter the shapes and colors in the result, and most images will benefit from at least a little bit of tweaking.
ADJUSTING YOUR IMAGE

Watch this video for an introduction to adjustment options. The instructions are also written out below.
Inside the Modern Artist - OUTPUT layer there are six subgroups, organized by color. You can hide each subgroup, one by one, to see what it does. Here, we explore the adjustments possible in three primary subgroups:
1. The blue subgroup, called Front, contains all the layers that create the abstract effect on the subject area you masked at the beginning. Your image will likely benefit from some adjustments in this subgroup; each layer is a smart object and can be highly customized. The two most important parameters on most layers are Threshold and Median.
For example, expand the layer called Shadow Overlay. Double-click on the Threshold smart filter to open a panel that lets you use a slider to decide how much the layer will be visible and present in the final image.
Use the Median filter to adjust the level of detail on this layer—a high Median value will create abstract shapes; a low value will create detailed shapes.
You can also make quick tweaks to the other layers in this group, to balance shadows and highlights. (Note that the Dark Detail layer has a Levels filter instead, and that the Base layer doesn’t have a Threshold option, because as the base it does not need to be calibrated.)
2. The action creates a black-and-white output and then uses a gradient map to re-map a chosen set of colors on the image, based on the original colors’ brightness values. The orange subgroup, called Color Maps, controls this map. Inside are ten color palette options; unhide one at a time to see the options (if you have multiple unhidden at once, the results will be combined).
Choose one gradient you like. Then click on the thumbnail to open the Gradients panel and see the gradient used to re-color the image. The colors at the right are mapped to the shadows of the image, the colors at the center are mapped to the midtones, and the colors on the right are mapped to the highlights.
Click on the gradient bar top open the Gradient Editor, where you can modify the colors and experiment. (If you’re new to the Gradient Editor, check out this primer. To learn more about how colors work together and make some interesting combinations, check out Adobe Color CC.)
3. The final key layers are named BG SHAPES (in the purple subgroup, named Back) and FG SHAPES (in the green subgroup, named FX). They have the same exact structure; the two layers can be adjusted in sync for great results.
To get a clear look at what FG SHAPES controls, hide BG SHAPES for a moment. FG SHAPES has four smart filters used to create deformations; they can be customized individually and also used together.
If you unhide all the smart filters, you can see the basic shapes. Double click on the layer’s thumbnail to open the smart object, inside are 16 different shape presets that are also highly customizable. Choose one of the shapes, and then close the smart object and save. You can then apply one or more smart filters to create the desired result.
Once you’ve explored the limits of these customizations, you can download BlackNull’s step-by-step guide, which also goes into detail about each of the action’s subgroups.
Subscribe to:
Comments (Atom)
Featured Post
Computers in Art Practice:Manfred Mohr
Artist Manfred Mohr Since 1969, Manfred Mohr has used computers and plotters as electronic and digital drawing aids, thus making inevita...
-
Able to understand why a design brief is critical to the design process Explain the purpose of a design brief The design ...
-
Principles of marketing and evaluation 1 .1 explain the importance of defining market segments to the developm...
-
What is a sales funnel? A sales funnel is a visual representation of the steps required to sell your products or services. A sales funnel s...
-
How to Create Effective Marketing Campaigns by Sam Ashe-Edmunds Related Articles 1 Top Ten Promotional Strategies 2 How to I...
-
Develop Design Principles and Techniques and Processes for Designing Products Give examples of how formal elements and principles of...
-
Adobe Illustrator is the perfect tool for creating abstract art with basic shapes and lines. In today’s tutorial I’ll show you how to creat...
-
Understand the formal elements and principles of design Give examples of how formal elements and principle...
-
This is the ability to use IT tools and devices for collaborative working and communications, such as web or video conferencing, instant me...
-
Understand how to organise and evaluate data that has been researched. 1.1 describe purpose and benefits of organising data so that it c...
-
Personal and professional development Einstein stressed that lifelong learning should be a focus because personal growth stops whe...


